A slow-loading WordPress site can frustrate visitors, negatively impact your search rankings, and consume unnecessary server resources. LSCache, a caching solution designed for LiteSpeed web servers, tackles these issues by storing and serving optimized versions of your pages in milliseconds. But installing the plugin is only half the job; unlocking its full potential requires careful configuration. In this guide, you’ll learn how to set up LSCache in WordPress, fine-tune its settings, and combine it with optimization tools and a CDN for maximum speed and performance.
Key Takeaway:
To configure LSCache in WordPress, install and activate the LiteSpeed Cache plugin, enable caching in the Cache tab, set appropriate TTL values, and enable mobile caching if your theme serves different layouts. Optimize images, configure page and file optimization, exclude dynamic pages from caching, and integrate QUIC.cloud CDN for faster global delivery.
Installing LSCache for WordPress
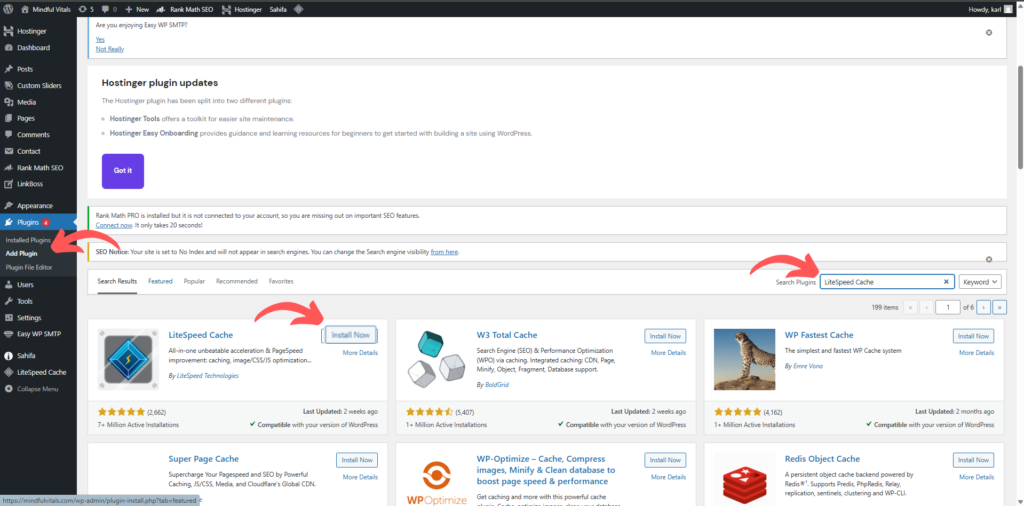
- Log in to your WordPress admin dashboard.
- Navigate to Plugins → Add Plugin.
- In the search bar, type LiteSpeed Cache.
Click Install Now, then Activate once the installation is complete.
If you already have another caching or optimization plugin (like WP Rocket, W3 Total Cache, or Autoptimize), deactivate it first. Running multiple caching plugins can cause conflicts and lead to slower speeds or broken layouts.
Verifying Your Site Is Being Cached
Once the plugin is active, it’s important to verify that LSCache is actually working. Open your site in a browser, right-click anywhere on the page, and select “Inspect” to launch the developer tools. In the Network tab, refresh the page and select the main document request — usually your domain name. In the Headers section, look for the line X-LiteSpeed-Cache: hit. A “hit” confirms the page was served from cache, while a “miss” means it wasn’t cached yet. If no cache header appears, check your LiteSpeed server configuration and ensure no other plugin is overriding cache settings.
Configuring Core Cache Settings
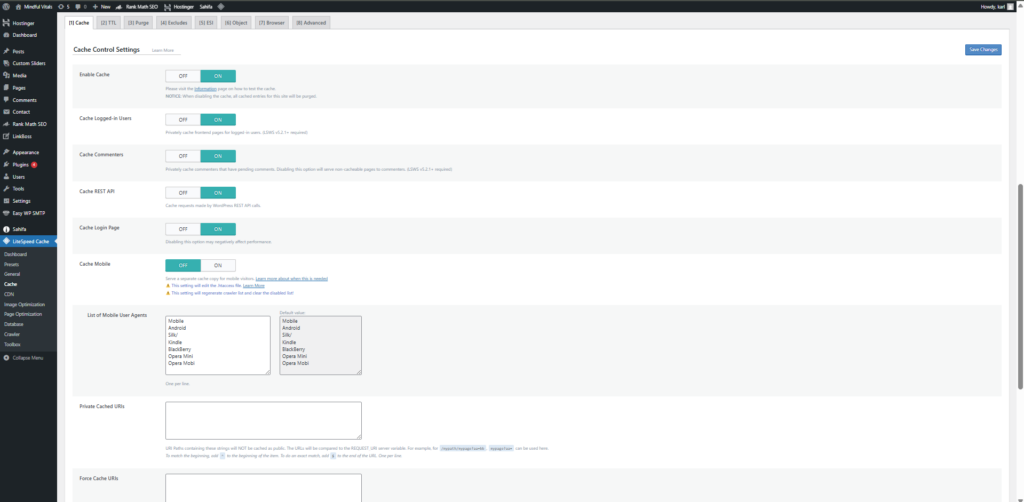
Open LiteSpeed Cache → Cache → Cache in your WordPress dashboard. Start by enabling Enable Cache to activate caching site-wide.
If logged-in users need personalized content, such as members or students on an e-learning site, enable Cache Logged-in Users and Cache Commenters. For most sites, it is best to leave these off to avoid showing outdated or incorrect data.
Keep the Cache Login Page disabled to prevent login and session issues. If your site relies heavily on the REST API, you can enable the Cache REST API to improve performance; however, turn it off if the data changes in real-time.
Adjust the Default Public Cache TTL, which controls how long cached pages are stored before being refreshed. A setting of 3600 seconds (1 hour) works well for most websites. You can also set values for Private Cache TTL and Front Page TTL for more control over specific content.If your theme serves different layouts or content for mobile devices, enable Cache Mobile so each device type receives the correct version. Use Drop Query Strings to ignore specific URL parameters, allowing those pages to be still cached.
Managing Cache Purging Options
- Go to LiteSpeed Cache → Cache → Purge.
- Under ‘Purge All On Upgrade’, turn this on so that the cache refreshes when you update WordPress, themes, or plugins.
- In Auto Purge Rules For Publish/Update, select the options for “All Pages” or just the affected content types, depending on your needs.
Use the ‘Purge All’ or ‘Purge by URL’ buttons for manual control when testing changes.
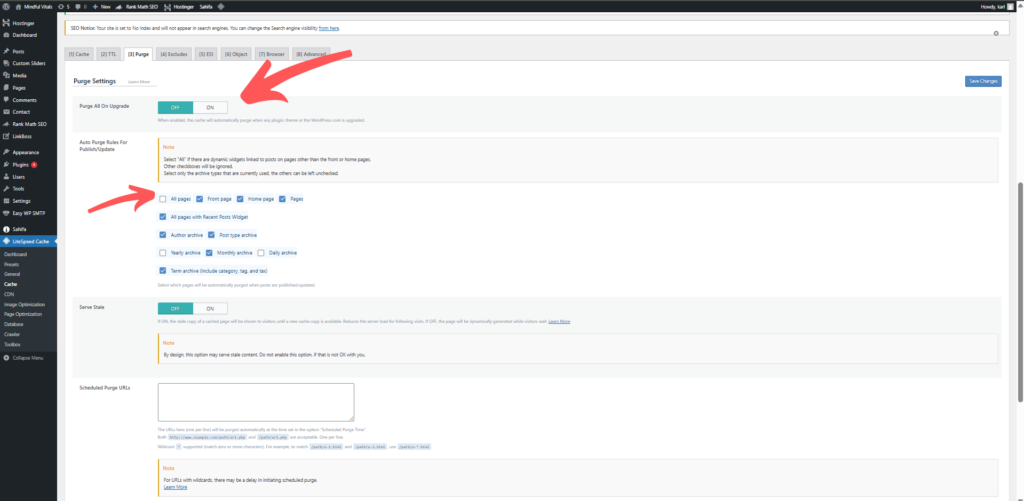
This ensures that visitors always see the latest version without having to clear the entire cache unnecessarily.
Excluding Specific Pages or Content from Caching
Some pages should never be cached because they rely on real-time updates:
- Shopping carts
- Checkout pages
- User dashboards
- Booking forms
To exclude them:
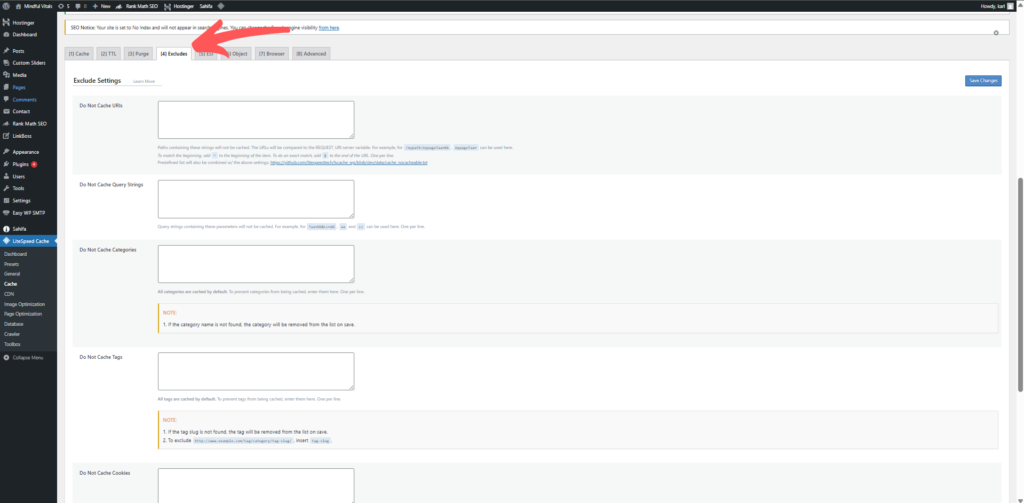
- Go to LiteSpeed Cache → Cache → Excludes.
- Add the URLs or query strings for pages to skip caching.
- Use cookie or category exclusions if certain users or post types must always see fresh content.
Page and File Optimization Techniques
Beyond caching, LSCache offers page optimization tools.
- Minification removes unnecessary spaces and comments from CSS, JavaScript, and HTML, reducing file sizes.
- The combination merges multiple files to reduce HTTP requests.
- Defer loading delays specific scripts until the main content has loaded, improving perceived speed.
Enable these options in Page Optimization and test each change individually to avoid breaking site layout or functionality.
Image Optimization with LiteSpeed
Large, unoptimized images can still slow down a cached site. LSCache’s image optimization feature compresses images without noticeable quality loss and converts them to the modern WebP format, resulting in smaller file sizes. In Image Optimization, request compression for your existing media library and enable automatic optimization for all future uploads. Activating WebP Image Replacement ensures supported browsers receive these lighter images automatically.
Integrating QUIC.cloud CDN with LSCache
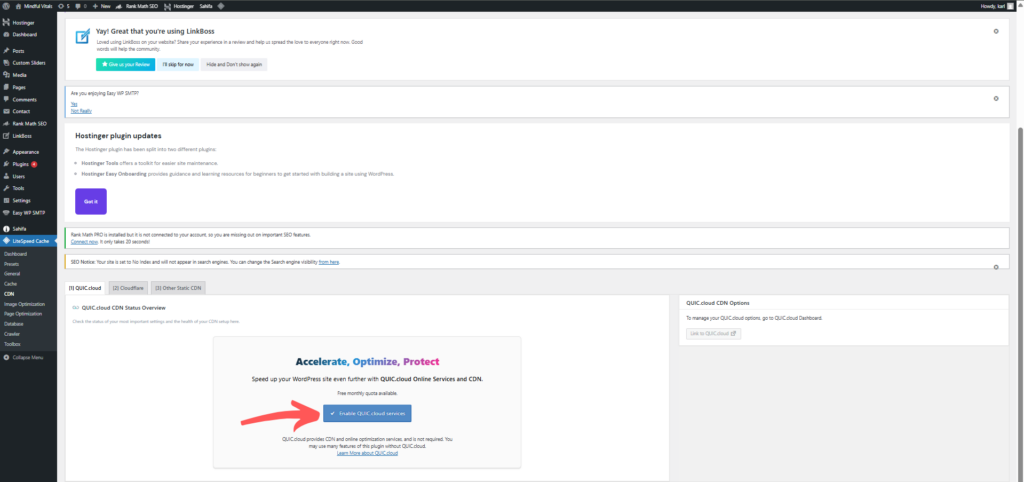
For faster content delivery worldwide, connect LSCache to QUIC.cloud. In the CDN tab, request a QUIC.cloud domain key and map your site’s static files to the CDN. This ensures visitors load cached assets from servers geographically closer to them, reducing latency and improving global performance.
Conclusion
Configuring LSCache in WordPress is a crucial step toward achieving faster load times, enhanced site performance, and an improved user experience. By properly installing the plugin, verifying its operation, and fine-tuning caching and optimization settings, you ensure that your website can handle increased traffic more efficiently while supporting SEO goals through reduced server response times. Remember to regularly test your site’s performance and clear caches after changes to maintain optimal results. With careful configuration and ongoing monitoring, LSCache becomes a valuable tool that helps your WordPress website run smoothly and effectively in today’s competitive digital landscape.


