Best Hosting Control Panels

Choosing the right hosting control panel is crucial for effectively managing servers and web hosting services. These panels centralize management of domains, email, databases, FTP, SSL certificates, and other critical server functions. With complex environments involving VPS, Linux, and Windows operating systems, as well as diverse hosting plans, selecting a control panel that ensures usability, performance, and security is crucial. In this article, we will discuss the key factors to consider when choosing a hosting control panel. We will also review some of the most popular control panels available today, highlighting their features, compatibility, and suitability for different hosting needs. This guide aims to help system administrators, hosting providers, and website owners make informed decisions that streamline server management and improve overall hosting efficiency. What is a Hosting Control Panel A hosting control panel is software that provides a user-friendly interface for managing web servers and hosting services, eliminating the need for deep technical expertise. These panels centralize essential server tasks such as domain configuration, email account setup, database management, FTP access, SSL certificate installation, and firewall configuration. This consolidation improves usability and streamlines server management. Most control panels support multiple operating systems, primarily Linux distributions and Windows. Compatibility with these operating systems affects the control panel’s ability to manage server resources efficiently and integrate with web applications. Whether managing a single server or multiple servers, the right control panel offers scalability, essential security features, and simplifies server administration. Factors to Consider When Choosing a Hosting Control Panel Operating System Compatibility Many hosting control panels are designed specifically for Linux distributions such as Debian, CentOS, or Ubuntu, while others also support Windows servers. This compatibility directly affects the control panel’s ability to leverage resources, manage server performance, and support various hosting applications. Selecting a control panel that aligns with your operating system ensures smoother integration and better server management. User Experience and Usability A hosting control panel with an intuitive user interface and high usability reduces the learning curve, simplifying routine server management tasks. Panels designed to be user-friendly make it easier to navigate complex server settings, manage email, FTP access, SSL certificates, and firewall rules without extensive training. An easy-to-navigate web panel enhances overall server administration efficiency. Scalability and Integration Capabilities Hosting providers managing multiple servers or VPS hosting environments require control panels that efficiently support the management of multiple servers. Additionally, control panels that offer strong integration with popular web applications, such as WordPress and database management tools, provide added flexibility. Whether the control panel is open-source or commercial affects customization options and licensing costs. Open-source panels offer the freedom to customize the software with no licensing fees, while commercial control panels typically provide more polished feature sets and dedicated support. Security Features Security features, such as SSL certificate management and firewall configuration, are essential. Control panels that simplify SSL installation and renewal processes enhance website hosting security. Efficient server resource management, including SSH access and database administration, also enhances overall server performance. Choosing a control panel with comprehensive security features ensures safer server administration and protection against vulnerabilities. cPanel cPanel is one of the most popular web hosting control panels in the industry, especially favored for Linux hosting environments. Its comprehensive feature set includes domain management, FTP, email accounts, database management, and integration with WordPress. cPanel’s user-friendly interface and robust server management tools make it accessible to both beginners and experienced system administrators. The control panel is designed to optimize server performance while providing essential features, including SSL certificate management, firewall configuration, and SSH access. cPanel’s compatibility with a wide range of Linux distributions and its extensive support network make it a reliable choice for many hosting providers and web hosts managing VPS and dedicated servers. Plesk Plesk stands out for its versatility, supporting both Linux and Windows operating systems, which enables seamless management of heterogeneous server environments. Plesk’s feature set includes multi-server management, scalability, integration with popular web applications, and advanced security tools, including SSL certificate handling and firewall management. This hosting control panel offering is favored by those who require a control panel designed to support a wide range of hosting plans and modern hosting services. Plesk supports smooth administration through its intuitive user interface, making it a popular choice among commercial control panels. Its ability to manage resources efficiently while supporting various operating systems is a significant advantage. DirectAdmin DirectAdmin is a lightweight hosting panel designed to simplify server management with low resource consumption. It appeals particularly to small to medium-sized hosting providers and VPS hosting environments seeking efficient server control without sacrificing usability. Despite its simplicity, DirectAdmin offers essential features, including database administration, email setup, FTP, and SSL certificate integration. Its intuitive web interface provides ease of use, making it an easy hosting control panel to navigate. This efficiency makes DirectAdmin a practical choice for hosting providers aiming to maintain server performance while streamlining server administration tasks. ISPConfig ISPConfig is an open-source web hosting control panel popular among hosting providers who prefer a free license with the freedom to customize. It supports various Linux distributions and offers strong system administration tools, including multi-server management and email account handling. Its open-source nature allows system administrators to tailor the control panel according to specific hosting needs, making it flexible for various hosting plans. ISPConfig supports server management tasks, including firewall configuration, database administration, and SSL handling, aligning well with modern hosting demands. Webmin Webmin is a powerful open-source control panel known for its flexibility and support across multiple operating systems, including Debian and other Linux distributions. It provides an easy-to-navigate web interface that allows users to manage server resources, firewall rules, and essential system administration functions. While Webmin is less focused on commercial hosting services, it excels in providing detailed server control for system administrators comfortable with granular server management. Its open-source nature ensures a free license and freedom to customize, making it a valuable tool for managing Linux and BSD systems. Vesta Control Panel Vesta Control Panel offers a straightforward and intuitive user
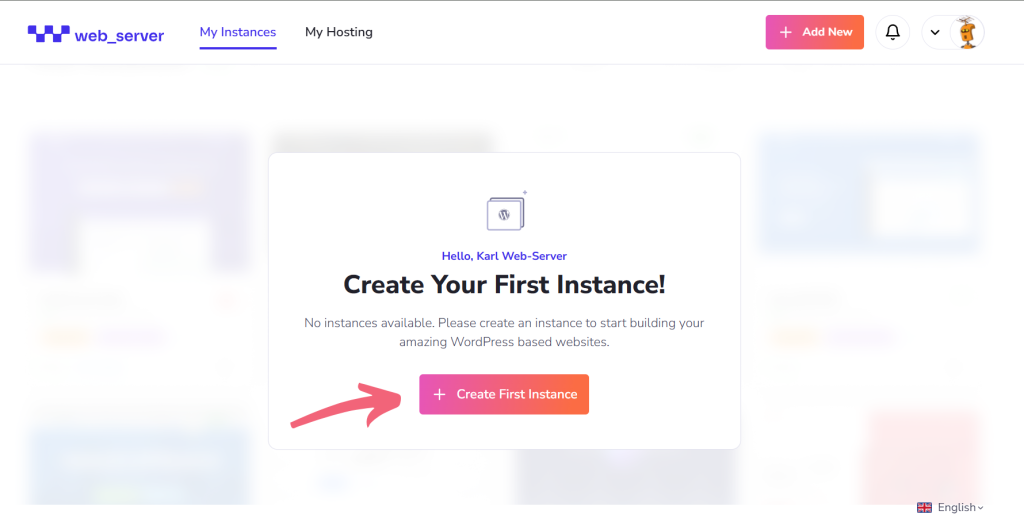
How to Migrate Your WordPress Website to Web-Server
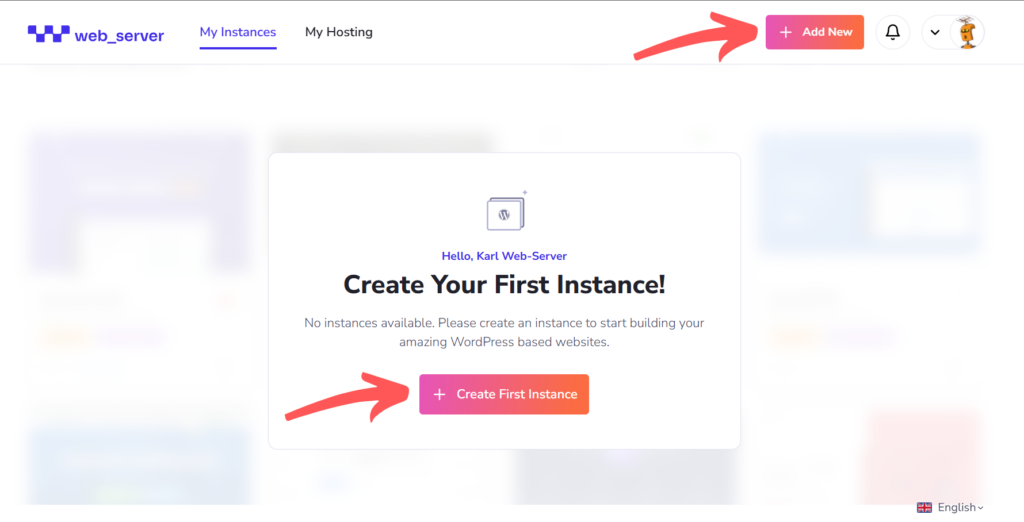
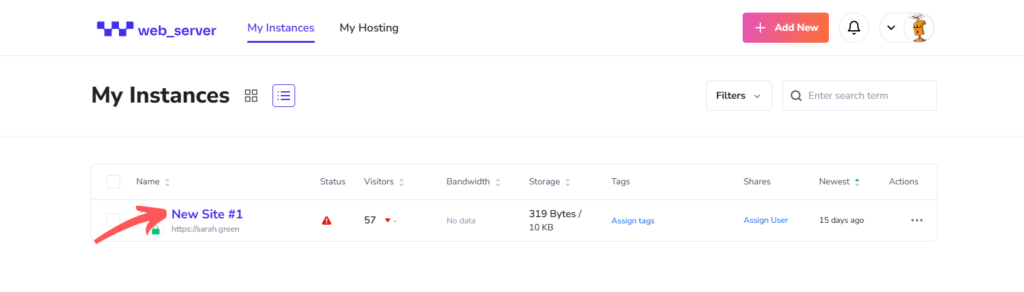
Migrating your WordPress website to a new hosting provider can feel overwhelming, especially if you’re unfamiliar with the technical details. However, with the right approach and tools, it can be a straightforward and stress-free experience. In this article, we will explore the essentials of migrating your WordPress site to Web-Server, including preparing for migration, the step-by-step process using Web-Server’s built-in tools, and what to do after the move to ensure your site runs smoothly. Whether you’re seeking improved speed, enhanced security, or easier site management, this guide will provide you with clear instructions and helpful tips to make your migration successful. What is Website Migration, and Why Does it Matter? Website migration involves transferring your entire WordPress site, including files, databases, themes, plugins, and settings, from one hosting provider to another. The main goal is to move your site seamlessly without losing data or causing downtime for your visitors. Website owners migrate for various reasons: to improve performance, enhance security, reduce costs, or simplify management. Migration may also be driven by the need for scalability or better customer support. While the benefits are clear, migration requires careful planning to avoid issues like broken links, data loss, or downtime that could disrupt the user experience or impact SEO. How Does Migration Work on Web-Server? Web-Server offers an easy-to-use migration feature that automates much of the process. Instead of manually copying files and databases, you can import your existing WordPress site by providing your current URL and FTP credentials. This saves time and reduces errors, making migration accessible even if you’re not a technical expert. Before you begin, ensure you have your current FTP hostname, username, password, and the path where WordPress is installed. It’s also a good idea to create a backup of your site, just in case. Step-by-Step Guide to Migrating Your WordPress Site Step 1: Log in to WBS Access your Web-Server account dashboard by logging in. If you don’t have an account, sign up on the Web-Server platform to get started. Step 2: Initiate the Migration If this is your first time logging in and you don’t have any WordPress instances, click the Create First Instance button. If you already have existing instances, click the Add New button in your dashboard’s upper right corner. Both options will direct you to the migration process. Step 3: Enter Your Current WordPress URL Choose Import Existing WordPress Instance, then enter the URL of your current WordPress site when prompted. Step 4: Enter Your FTP Account Before entering your FTP details, make sure you have your hostname, username, password, and installed path ready. These are needed to securely connect Web-Server to your current host and transfer your site files. If you have this information, go ahead and enter your FTP hostname or IP address, username, password, and installed path below. Then click Continue to start the migration. Depending on your site size, this may take a few minutes. If you’re unsure where to find your FTP credentials, don’t worry, this is a common question. We’ve included a quick guide to help you locate them on popular hosting platforms. Your FTP credentials are usually available in your hosting account’s control panel. Here’s how to find them for some of the top hosting providers: If your hosting provider isn’t listed, try logging into your hosting dashboard and looking for sections labeled FTP Accounts, FTP Settings, or FTP Access. Alternatively, you can contact your hosting provider’s support team for help. Once you have your FTP details, return to Step 4 to complete the migration setup. Step 5: Complete Migration Once the migration finishes, you’ll receive a confirmation. You can now access your WordPress dashboard or manage your site directly through Web-Server’s interface. What to Do After Migration Troubleshooting and Support If your migration doesn’t go as planned, here are some common issues and solutions: Make the Move with Confidence Migrating your WordPress site to Web-Server is not just a technical step; it’s a strategic decision to enhance your website’s performance, security, and ease of management. Web-Server’s powerful and intuitive migration tools make the transition seamless and efficient, ensuring that even those new to site transfers can complete the process with confidence and minimal effort. By choosing Web-Server, you’re investing in a hosting platform designed to deliver lightning-fast loading speeds, robust protection against threats, and centralized management features that simplify your day-to-day operations. Start your migration today and take the first step towards a more reliable, secure, and high-performing website that supports your business goals and growth.
What is NVMe Hosting?

As websites and applications become more resource-intensive, the demand for faster and more efficient hosting solutions continues to grow. The storage technology used in a hosting plan plays a critical role in overall site performance, especially as user expectations rise and digital workloads increase. This article will explore what NVMe hosting is, how it functions within modern server infrastructure, and how it compares to traditional SSD and HDD hosting. It will also cover the different types of hosting that utilize NVMe technology, the performance advantages it delivers, and when it is worth making the switch for better speed, scalability, and reliability. What is NVMe and Why Does it Matter in Hosting NVMe stands for Non-Volatile Memory Express. A storage interface that connects solid-state drives (SSDs) directly to a server’s motherboard using the Peripheral Component Interconnect Express (PCIe) bus. This approach allows for much faster data transfer speeds compared to the older SATA interface used by traditional SSD storage and hard disk drives (HDDs). NVMe SSDs significantly reduce access times and latency by allowing parallel command execution, making them ideal for applications that require rapid data processing. In hosting environments, this translates into more responsive websites and applications, especially under high-traffic conditions. Unlike traditional storage devices, Non-Volatile Memory Express drives are engineered to handle heavy workloads with minimal delay. They offer faster performance because they use fewer CPU cycles to manage storage, leading to more efficient server resource utilization. How NVMe Hosting Works in Modern Infrastructure NVMe hosting integrates NVMe storage technology into various hosting setups, including shared hosting, VPS hosting, and dedicated server hosting. By replacing older SSDs or HDDs with NVMe drives, hosting providers can deliver faster data access and increased customer throughput. Non-Volatile Memory Express drives also provide benefits in shared hosting environments, but they’re most impactful in VPS hosting and dedicated server hosting. For instance, it enhances a virtual private server’s read/write speeds, improving overall performance for websites hosted on the server. Dedicated server hosting using NVMe ensures that all physical resources, including these drives, are allocated solely to one user, offering unmatched speed and reliability. Types of Hosting That Use NVMe Technology Different hosting services now include NVMe as a core component of their infrastructure. NVMe VPS hosting is one of the most popular options, balancing performance and cost. A VPS server with NVMe storage is ideal for medium to large-scale websites that require more resources than shared hosting can provide. Non-Volatile Memory Express dedicated servers are tailored for high-performance workloads like e-commerce sites, high-traffic applications, and enterprise-level software deployments. These servers ensure dedicated resources and faster data processing, making them a strong fit for businesses that prioritize speed and reliability. NVMe SSD shared hosting plans are also available. These plans offer an upgrade over traditional SSD hosting, using Non-Volatile Memory Express drives to deliver faster website performance, even within shared environments. NVMe vs Traditional SSD and HDD Hosting Traditional SSD hosting, while faster than HDDs, relies on the SATA interface, which limits their data transfer capabilities. HDD hosting, on the other hand, uses spinning disks and mechanical components, making it the slowest and least reliable option. NVMe hosting uses the PCIe interface, which provides faster data paths directly to the CPU. This results in lower latency, higher input/output operations per second (IOPS), and significantly better performance and reliability. It has faster drives than traditional SSDs by a wide margin and offers superior scalability for growing websites. The performance difference is especially clear in high-traffic scenarios, where websites hosted on NVMe platforms maintain consistent speed and responsiveness compared to those using traditional storage. Performance Advantages of NVMe Hosting One of the most compelling benefits is its ability to enhance overall performance. Fast data transfer and reduced access times ensure that websites and applications load quickly, even during peak traffic periods. NVMe technology supports faster speeds than traditional storage options, which is essential for maintaining strong website performance. It also improves the hosting environment’s efficiency. With lower latency and better server RAM use, applications requiring heavy data access perform more smoothly. This results in better resource management and a more stable user experience. It provides high performance across a range of use cases, from small business websites to large-scale platforms with intensive data needs, because it can handle larger workloads with less strain on server hardware. When to Consider Switching to NVMe Hosting Businesses and developers using traditional SSD or HDD hosting should consider switching to NVMe hosting if they require better performance, faster load times, or more reliable uptime. Applications experiencing performance bottlenecks, ecommerce platforms with high transaction volumes, and websites seeing increased traffic are all strong candidates for storage upgrades. Hosting plans powered by NVMe offer better scalability and are ideal for those who anticipate future growth. Whether you’re running a virtual private server or need a dedicated hosting environment, switching to NVMe provides long-term performance benefits that traditional storage simply can’t match. Driving Better Hosting Performance with NVMe Technology NVMe hosting represents a significant advancement in web hosting technology. By leveraging the speed and efficiency of its storage, hosting providers can offer fast data access, lower latency, and superior reliability across all types of hosting plans. As more businesses prioritize site speed and performance, NVMe hosting offers a future-proof solution that delivers on both fronts. Whether using shared hosting, a VPS server, or a dedicated server, upgrading to NVMe can substantially improve your website’s performance and reliability in today’s demanding digital environment.
Managed WordPress Hosting vs Shared Hosting

Choosing the right hosting plan is essential to building a WordPress website. Hosting is a service that stores your website’s files and makes them accessible online. With many hosting options available, it can be challenging to decide which one best fits your needs. This article will explore the key differences between managed WordPress hosting and shared hosting. We will explain what each hosting type offers, highlight their unique features and benefits, and help you understand which hosting option best suits your WordPress site based on your needs and budget. What Is Shared Hosting? Shared hosting is a cost-effective web hosting service in which multiple websites share a single server’s resources, like CPU, memory, and bandwidth. Due to its affordability and simplicity, shared hosting is a popular plan for beginners and small websites. Shared hosting plans typically include basic features like control panel access, email hosting, and one-click installers for platforms like WordPress. While shared hosting provides an easy way to get a website online, it is not specifically optimized for WordPress sites. Resources are shared among users, leading to fluctuating performance and limited security. Additionally, shared hosting plans usually lack automatic WordPress updates and dedicated WordPress support, making them less suitable for growing or resource-intensive WordPress websites. What Is Managed WordPress Hosting? Managed WordPress hosting is a type of hosting service optimized specifically for WordPress websites. Unlike shared hosting, it provides dedicated resources and includes full technical task management by the hosting provider. Managed WordPress hosting plans include automatic WordPress core updates, daily backups, caching tools, enhanced security, staging environments, and expert WordPress support. Benefits include faster load times, improved uptime, and proactive security tailored for WordPress sites. Managed hosting frees site owners from technical maintenance, allowing them to focus on content and growth. Though it generally carries a higher price tag than shared hosting, many find the investment worthwhile for the specialized performance and support. Differences Between Managed WordPress Hosting and Shared Hosting The main differences between shared hosting and managed WordPress hosting involve resource allocation, management, and optimization. Shared hosting means websites share server resources, which can cause slower speeds and inconsistent performance during traffic spikes. Managed WordPress hosting allocates dedicated resources optimized specifically for WordPress sites, ensuring stable performance and faster load times. Shared hosting plans typically leave WordPress updates and security to the user in terms of management. Managed hosting providers handle automatic updates, backups, and proactive security, reducing the technical burden on site owners. Features like staging environments and WordPress-optimized server configurations further differentiate managed WordPress hosting from standard shared hosting plans. While shared hosting offers an affordable entry point suitable for small or low-traffic sites, it lacks the tailored optimizations and comprehensive support of managed WordPress hosting. Choosing the right hosting plan depends on your website’s size, traffic, and technical needs. Choosing Between Shared Hosting and Managed WordPress Hosting When Shared Hosting Makes Sense Shared hosting is a cost-effective solution for small websites, blogs, or projects with limited budgets and low traffic. Many shared hosting providers offer plans with easy WordPress installation tools and basic support, making it accessible for beginners and those launching their first WordPress website. However, since shared hosting is not optimized specifically for WordPress sites, it may lack features like automatic updates, advanced security, and performance enhancements. Shared hosting may no longer meet your needs as your WordPress site grows in size or traffic. Why Opt for Managed WordPress Hosting Managed WordPress hosting is designed specifically for WordPress websites, providing hosting plans with automatic core updates, daily backups, malware scanning, and expert WordPress support. This hosting option offers faster loading speeds and improved uptime through dedicated resources and server configurations optimized specifically for WordPress sites. It’s especially beneficial for e-commerce or high-traffic sites requiring stable performance and enhanced security. While managed hosting typically has a higher price tag than shared hosting, it delivers a comprehensive hosting solution tailored to the needs of WordPress website owners who want professional support and worry-free management. Other Hosting Types to Consider Beyond shared hosting and managed WordPress hosting, other hosting types like VPS (Virtual Private Server) and dedicated hosting offer alternatives for growing WordPress websites. VPShosting provides a virtualized server environment with dedicated resources, offering better control and performance than shared hosting. Dedicated hosting rents an entire physical server, delivering maximum customization and reliability but requiring more technical expertise and a larger budget. These hosting solutions are worth considering if your WordPress website exceeds the limits of shared or managed WordPress hosting plans, especially when your site demands increased resources, flexibility, or advanced configurations. How to Choose the Right Hosting Provider Selecting the right hosting provider is crucial for your WordPress site’s success. Look for a hosting company that understands platforms like WordPress and offers web hosting plans optimized specifically for WordPress sites. Important factors include uptime guarantees, security features, speed optimization, customer support quality, and scalability. Whether you choose a shared hosting plan or a managed WordPress hosting plan, the hosting provider influences your website’s performance, reliability, and ease of management. The best managed WordPress hosting providers combine optimized environments with expert support and features that help you maintain and grow your WordPress website efficiently. Conclusion Choosing between managed WordPress hosting and shared hosting depends on your website’s size, traffic, budget, and technical needs. Shared hosting offers an affordable entry point for small, low-traffic WordPress sites but lacks WordPress-specific features and optimization. Managed WordPress hosting provides a hosting solution optimized specifically for WordPress sites, delivering superior speed, security, and professional support at a higher price. By understanding these differences and assessing your WordPress website’s requirements, you can select the hosting plan that ensures your site performs well and remains secure as it grows.
How to Set Up Staging on Web-Server
Managing a WordPress website involves constant updates and improvements. However, making changes directly on a live site can sometimes lead to unexpected issues or downtime. That’s where a staging environment comes in handy. In this article, we will guide you through the process of setting up a staging site on Web-Server. You’ll learn what staging is, why it’s essential for your website management, and how to create one step-by-step with Web-Server’s tools. What is Staging and Why Is It Important? A staging environment is essentially a clone of your live website. It allows you to test updates, plugins, and design changes in a safe, controlled setting without affecting your live site or visitors. This allows you to identify and fix any issues before they impact your real audience. Using staging helps protect your website’s performance and uptime. It reduces the risks that come with direct updates, giving you peace of mind that your live site remains stable while you work on improvements behind the scenes. Step-by-Step Guide to Setting Up Staging on Web-Server Step 1: Log in to Web-Server Begin by logging into your Web-Server account using your username and password. Once logged in, you will land on the main dashboard, which displays all your WordPress sites hosted on Web-Server. Step 2: Access the Staging Option To create a staging environment, navigate to your Instances dashboard by clicking on the site name you want to manage. You have two options to proceed: Please note that each WordPress installation can only have one staging environment. Step 3: Create the Staging Environment Click on the Staging option to begin. The system might prompt you to provide a subdomain, but “staging” works perfectly as the default. Next, Web-Server will calculate disk usage and present you with the following information: You may choose to exclude the uploads directory to save space. Once you’ve reviewed these details, click Create Staging to start the setup process. Step 4: Staging Setup Complete After a brief process, your staging site will be ready. You can access it anytime by clicking the Staging tab beside your dashboard’s Live tab. This tab replaces the plus button you used earlier to create the staging site. Step 5: Access Your Staging Site To work on your staging environment, click the Staging tab next to the Live tab. From here, you can test updates, install plugins, or make design changes without impacting your live site. Synchronizing Content Between Live and Staging Web-Server provides two useful features to keep your live and staging sites in sync: Push to Staging This updates your staging site with the current content from your live website. It’s helpful to refresh staging before making new changes. Push to Live After testing and confirming your updates on staging, this feature pushes those changes to your live website, making them visible to your visitors. These synchronization tools ensure a smooth workflow and help you manage your website confidently. Test Confidently, Deploy Safely with Web-Server Staging Setting up a staging environment on Web-Server is straightforward and essential to managing a WordPress site safely. By testing your changes in staging, you minimize risks to your live site and ensure your visitors always have a smooth experience. Give it a try today and enjoy a worry-free way to develop and update your website.
How to Speed Up Your WordPress Website
In today’s digital age, a slow website can significantly impact your business. Visitors expect quick load times, and even a delay of just a few seconds can result in high bounce rates and lower conversion rates. For WordPress users, ensuring your website loads quickly is crucial to maintaining user satisfaction and improving your site’s overall performance. This article will discuss several actionable strategies for speeding up your WordPress site. We will cover key aspects such as optimizing your WordPress hosting, choosing the right WordPress theme, using effective speed optimization plugins, and leveraging techniques like caching and CDNs. By the end of this guide, you’ll have the tools and knowledge to significantly improve your site’s page load times and performance. Why Speed Matters for Your WordPress Website The speed of your website is not just a technical concern; it directly affects the user experience, search engine optimization (SEO), and conversion rates. A faster website creates a better user experience, leading to longer visits and higher engagement. On the other hand, a slow WordPress website can frustrate visitors, causing them to leave before the web page even fully loads. From an SEO perspective, page load times are a key ranking factor for Google. Sites that load quickly rank higher in search results, as search engines prioritize user-friendly websites. Additionally, a slower website often leads to a higher bounce rate, negatively impacting SEO performance. Studies show that a delay of even one second in page loading can reduce customer satisfaction by 16% and decrease conversions by 7%. This highlights the critical importance of WordPress speed optimization for your WordPress website. Optimizing WordPress Hosting for Speed One of the most crucial factors affecting WordPress speed is your WordPress hosting. Poor hosting can result in slow load times and a less reliable site. If you’re using shared hosting, your website shares resources with many other sites, which can cause a significant slowdown, especially during traffic spikes. Opting for managed WordPress hosting can significantly enhance your site’s speed. Managed hosting services are optimized specifically for WordPress performance, ensuring faster page loading times. These services often come with pre-installed caching systems, security measures, and server optimizations that help reduce load times. Choosing a high-performance WordPress hosting ensures your website can handle increased traffic while maintaining optimal performance. It’s worth considering premium managed WordPress hosting solutions, which provide dedicated resources, faster processing power, and better scalability, improving website speed. Choosing the Right WordPress Theme Your WordPress theme plays a significant role in your site’s overall speed. While using a theme with many built-in features may be tempting, a heavy theme can significantly slow down your site. A lightweight WordPress theme optimized for speed can significantly speed up your site, ensuring it doesn’t become bogged down with unnecessary scripts and large file sizes. When selecting a theme, look for one that is optimized for speed and doesn’t contain excessive code or images that could negatively impact page speed. There are many themes available that are specifically designed to be fast and responsive, helping to enhance site performance. Speed Optimization Plugins Using the right WordPress plugins can significantly improve your site speed. One of the most effective ways to achieve this is by installing a caching plugin like WP Rocket. Caching plugins store static versions of your web pages, reducing the time it takes to retrieve data from the database and thus improving page load times. This reduces server load and ensures users experience faster loading speeds, contributing to better overall WordPress performance. Optimize Your WordPress Database Over time, your WordPress database can become cluttered with unnecessary data such as post revisions, spam comments, and expired transients. This can slow down your website by increasing the size of your database, making it harder for your site to retrieve information efficiently. To address this, it’s essential to clean your WordPress database regularly. Using a plugin designed for WordPress database optimization, you can easily remove unwanted data and optimize the database tables, leading to faster site loading. Reducing the database’s size allows quicker access to your site’s data, improving site performance. Leverage Caching and Content Delivery Networks (CDN) Caching and Content Delivery Networks (CDN) are powerful techniques that significantly reduce load times and improve site speed. Caching stores static files such as images, CSS, and JavaScript, so they don’t need to be reloaded from the server with every visit. This reduces server load and makes your website faster. A WordPress CDN distributes your site’s content across multiple servers worldwide, ensuring visitors can download files from the server nearest to them. By utilizing a CDN, you can dramatically improve page load times for visitors regardless of their location, resulting in a better user experience and faster website performance. Optimize Your Images Large, unoptimized images are often the primary reason for slow WordPress websites. To speed up your site, it’s crucial to optimize your images. Using an image optimization plugin will compress images without losing quality, improving page load times, and reducing the impact of large file sizes. Additionally, implementing lazy loading for images ensures that images are only loaded when visible to the user, helping to reduce initial load times further and improve site performance. This technique is handy for image-heavy websites, ensuring they remain fast and responsive. Test and Monitor Your WordPress Site Speed Regularly testing your WordPress website speed is crucial for maintaining site performance. Tools like Google PageSpeed Insights and GTMetrix can provide detailed insights into how fast your website loads and where you can improve. After running a speed test, you can identify specific areas of your website that may need optimization. Track these metrics over time to ensure your website continues to load faster and remains optimized for both users and search engines. Keep Your WordPress Website Updated Ensuring that your WordPress core, plugins, and themes are always up to date is essential for performance optimization and security. Outdated software can introduce vulnerabilities and lead to slower performance. Regular updates not only enhance your site’s security but
How to Secure Your WordPress Website with Backups and Restores on Web-Server
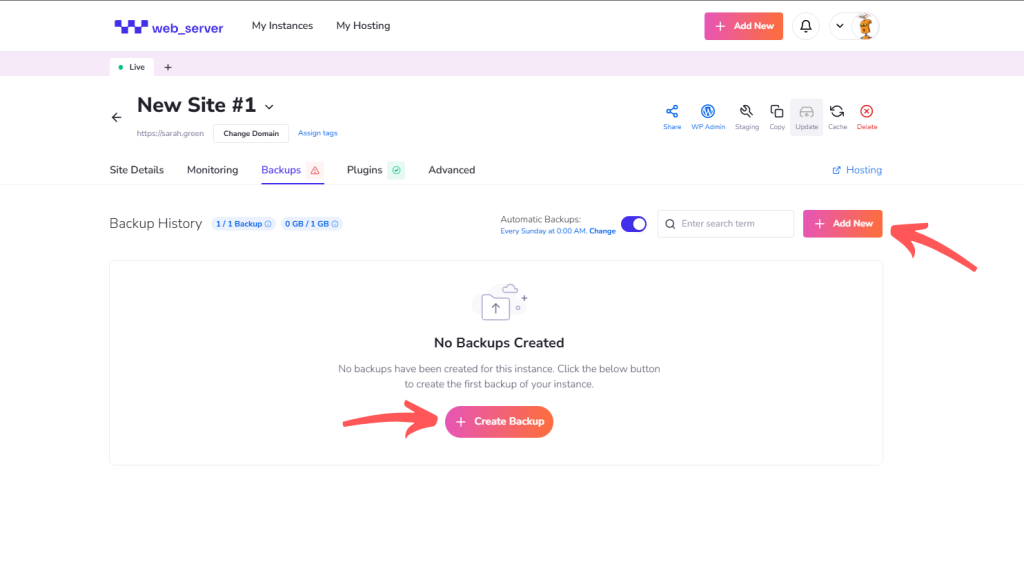
Backing up your WordPress website is a fundamental aspect of managing a website. Regular backups ensure you have a secure copy of your site, protecting you from data loss due to hacking attempts, failed updates, or human error. Web-Server (WBS) provides a reliable backup system that allows you to easily protect, restore, and manage your website. What are Backups Creating regular backups is one of the most effective ways to protect your WordPress website from data loss or unexpected issues. A backup is a complete copy of your website at a specific time. It includes everything your site needs to function, such as your content, images, themes, plugins, settings, and the database that stores user information and site data. With Web-Server (WBS), backups are comprehensive and reliable. Whether recovering from a faulty update, a plugin error, or an accidental change, you can restore your site to a previous, stable version. WBS offers both manual and automatic backup options. You can manually create a backup before installing updates or making design changes. WBS also performs automatic backups on a schedule, ensuring your site is protected even when you aren’t actively managing it. Each backup is securely stored and contains all the necessary components to restore your site when needed. Watch the Step-by-Step Video Watch the complete walkthrough of the process in this video, or check the detailed step-by-step guide how to back up your wordpress website on Web-Server with confidence. How to Access Your Backups Step 1: Log in to Your WBS Account Start by signing in to your Web-Server (WBS) account at web-server.com. Once logged in, you’ll arrive at your main dashboard, where all your WordPress sites hosted on WBS are listed. Step 2: Open Your Site Management Dashboard Locate the website you want to manage from the list. You can access the management dashboard in two ways. The first is by clicking directly on the site name, which immediately takes you to the dashboard for that site. The second option is to hover over your site entry, which will reveal the “Manage Site” and “WP Admin” buttons. Click “Manage” to open the site’s management dashboard. Both methods take you to the same place. Step 3: Navigate to the Backups Section Once inside the site’s management dashboard, look for the “Backups” tab in the navigation menu. Clicking this tab will open the Backups section, where you can view, create, and manage all backups associated with that site. Step 4: View Your Backup History In the Backups section, you’ll see a list of all available backups, each labeled with a timestamp and relevant details. This is your backup history. From here, you have complete control over each saved version of your site. You can review backup details, download copies, restore your site to a previous version, or delete backups that are no longer needed. How to Create a Backup Step 1: Locate the Backup Controls Inside the Backups section of your site’s dashboard, you’ll see a list of previously created backups and their timestamps. At the top-right of this section, you’ll find a button labeled “Add New.” This is one of the options you can use to create a new backup manually. Step 2: Start the Backup Process Click the “Add New” button to initiate the backup. Alternatively, if it’s your first time creating a backup, you’ll notice a “Create Backup” button at the bottom of the page. Clicking either button will generate a complete snapshot of your WordPress site. Step 3: Wait While the Backup is Created Once initiated, Web-Server will begin compiling all the necessary components of your site, including your content, media library, installed themes and plugins, configuration settings, and the WordPress database. The system handles this process automatically and efficiently. Depending on the size of your site, the backup may take a few moments to complete. Step 4: Verify the Backup in Your History After the process finishes, the newly created backup will appear at the top of your backup history list. Each backup entry is labeled with the exact date and time it was created, making it easy to identify. You’ll also see options next to each backup: Download, Restore, or Delete. Manual backups provide control, especially before performing major updates, installing new plugins, or making design changes. They create a secure restore point, ensuring your site can be rolled back if needed. In addition to manual backups, Web-Server (WBS) offers automated backups that run without user input. These automated backups act as a built-in safety net, ensuring your website is regularly protected even if you forget to create one manually. Automated backups can be scheduled to run at a time that minimizes impact on site performance. Managing Your Backups Managing backups in WBS is straightforward and secure. Each backup entry includes options to download, restore, or delete: Restoring Your Backup Restoring a backup with Web-Server is a quick process. In the Backups section of your site dashboard, locate the version you want to restore and click the “Restore Backup” button next to it. A confirmation prompt will appear to make sure you intend to proceed. Once confirmed, WBS will begin restoring your website to the selected backup state. It’s important to note that restoring a backup will overwrite your current website data with the contents of the selected backup. For safety, it is recommended to download your latest backup before initiating a restore to ensure you have a recent copy saved. Stay Protected with Smart Backup Management Managing your WordPress backups with Web-Server is designed to be reliable and straightforward. Whether scheduling automatic backups or restoring your site, WBS offers straightforward tools to maintain your site’s security. There’s no need for complicated tools or technical expertise—everything you need is built into your dashboard.
How to Set Up WordPress on Web-Server: A Step-by-Step Guide
Launching and managing a WordPress website doesn’t have to be complex or stressful. Whether you’re a business owner, blogger, or developer, finding the right hosting solution is crucial for your site’s performance and security. This is where Web-Server (WBS) comes in, offering an all-in-one managed WordPress hosting platform designed to make your life easier. With WBS, you get lightning-fast load times, top-notch security, and powerful tools to manage your WordPress sites effortlessly. From automatic backups to staging environments, WBS takes care of the technical side so you can focus on growing your online presence. In this guide, we’ll walk you through the simple steps to set up WordPress on WBS and show you how to make the most of its robust features for a hassle-free hosting experience. Watch the Step-by-Step Video Watch the complete walkthrough of the process in this video, or check the detailed step-by-step guide to set up WordPress on Web-Server with confidence. Step 1: Log in to WBS The first step is to log in to your WBS account. If you don’t have an account yet, you’ll need to sign up on the Web-Server platform. Once logged in, you’ll have access to the WBS management interface, where you can create and manage your WordPress instances. Step 2: Create Your First Instance Once logged in, the next step is to create a new hosting instance for your WordPress site. Follow these steps: Step 3: Create a New WordPress Instance Click the Create New WordPress Instance button. This action will begin the installation process for your new WordPress site. WBS simplifies the process by providing pre-installed, ready-to-go WordPress instances. Step 4: Enter Your Domain Name You’ll then be prompted to enter your domain name. If you already have one, simply enter it in the provided field. If you’re new to WBS, don’t worry – your domain will be assigned to you when you subscribe to the service, making the setup process seamless and easy. Once your domain is set up, click ‘Create Site’ to initiate the installation process. Step 5: Site Installation Complete After the installation finishes, your WordPress site will be live and ready to use. You’ll see a notification confirming the installation is complete. Step 6: Access Your Dashboard Now that your site is live, you can access the WordPress dashboard for easy management. This dashboard allows you to customize, manage content, and tweak your site’s settings. Step 7: Managing Your Site The WBS management interface provides various tools to keep your WordPress site optimized, secure, and functioning smoothly. Here’s a deeper dive into the key management features: Site Details View essential information about your site at a glance. This includes: Backup WBS automatically backs up your site daily to ensure you never lose data. However, you can also manually initiate backups if you want extra control. Here’s what you need to know: Plugins Plugins are vital for enhancing your WordPress site’s functionality. The WBS platform makes it easy to manage your plugins: Advanced Settings For users who need more control, WBS provides a comprehensive suite of advanced features: Log in via SSO (Single Sign-On) With Single Sign-On (SSO), you can seamlessly log into your WordPress dashboard without remembering separate login credentials. This feature streamlines your workflow and enhances security by reducing the passwords you need to manage. Step 8: Customizing and Managing Your WordPress Site Now that your WordPress site is up and running and your dashboard ready, it’s time to make it your own. You can enhance functionality and design by installing themes and plugins, fine-tuning settings through the WordPress admin panel, and monitoring your site’s performance and security through the intuitive WBS interface. Take Your WordPress Site to the Next Level with WBS Setting up and managing your WordPress site is simple with WBS. With features like staging environments, automatic backups, and easy plugin management, WBS handles the technical side so you can focus on growing your business and engaging your audience. WBS offers a secure, reliable platform that’s easy to maintain, with optimizations to keep your site performing at its best. Whether you’re just starting out or scaling up, our user-friendly interface and helpful support team ensure your site runs smoothly every step of the way. Get started with WBS today and experience hassle-free WordPress hosting that helps your business grow faster with less effort.
How to Get Free Web Hosting and a Domain for WordPress
Creating a WordPress website doesn’t have to come with a hefty price tag. Whether you’re launching a blog, portfolio, or small business site, getting a free domain and hosting to build your WordPress website from the ground up is possible. In this article, you’ll learn how to get free web hosting and a domain name for WordPress, understand what to expect from a free plan, and explore when upgrading might make sense. We’ll walk through key steps, highlight hosting providers that offer no-cost options, and discuss what features and limitations to look out for. Understanding Free Hosting and Domains To get started with a WordPress site, you need two essential elements: a domain name and a web host. Both are required to bring your site online. A domain name is the address users type into their browser to visit your website (e.g., yoursite.com). It’s crucial for branding, SEO, and professionalism. A web host stores your site’s data on a server and delivers your content to visitors. Even a free website needs a reliable host. Most free hosting plans have limitations like reduced storage and bandwidth, fewer customization options, and limited support. Similarly, free domain names may be limited to specific domain extensions like .tk or may come as a subdomain (e.g., yourname.wordpress.com) rather than a full custom domain. Despite these restrictions, a free WordPress site is a good solution for personal blogs, test projects, or beginner developers learning the platform. How to Get Free Hosting for Your WordPress Website Choose a Free Hosting Provider Look for WordPress hosting services that provide free plans. Providers like Hostinger occasionally run promotions that include free hosting for a limited time. Other platforms, such as InfinityFree and ByetHost, offer always-free hosting with essential features. These providers often offer a free WordPress installation and allow you to create a site for free using a simple control panel. Sign Up and Install WordPress After choosing your host, register a domain if available or choose a subdomain. Then, use their built-in tools to install WordPress. Many services offer pre-installed WordPress environments, significantly speeding up the setup process. This process often includes: Evaluate Limitations With a free plan, you’ll likely experience limited resources such as restricted storage and bandwidth, fewer customization features, and ads placed on your site. You might also be limited in how many websites you can host. Some allow you to host up to 10, while others may limit you to one. If your WordPress site starts attracting traffic or needs more flexibility, you can upgrade to a high-performance hosting package that removes these constraints. How to Get a Free Domain Name for Your WordPress Site Get a Free Domain with Hosting Some hosting services, especially during promotions, include a free domain name for the first year when you sign up for even a basic or free hosting plan. While these may later require renewal fees, they offer a great way to start with a custom domain like yourbrand.com. Use a Subdomain If a full domain isn’t offered, many hosting providers allow you to launch your site for free using a subdomain (e.g., yourname.hostsite.com). This option is acceptable for testing or hobby projects, but may appear less professional to visitors. Register Through a Free Domain Registrar Some registrars, like Freenom, allow you to register a domain with extensions such as .tk, .ml, or .ga at no cost. While these domain extensions aren’t as widely recognized as .com or .net, they’re valid and can be used to launch a complete WordPress website. Read the terms carefully, and don’t get locked into hidden renewal fees or conditions that restrict ownership or control. Limitations and Considerations of Free Hosting and Domains While launching a free website can be a practical first step, knowing the limitations of free hosting and a free domain name is important. Most free plans impose strict limits on storage and bandwidth, which can impact the performance and scalability of your WordPress site. In many cases, providers place ads or watermarks on your site, reducing your ability to maintain a consistent brand identity. Custom email features are typically excluded, and customer support may be limited or unreliable, resulting in more frequent downtime. Additionally, a free domain may come with restrictions on ownership, shorter registration periods, or may be tied to the original hosting provider, limiting your flexibility. Some plans also restrict access to advanced features like themes and plugins, making it harder to customize or expand your WordPress website as it grows fully. Using WordPress.com for Free Hosting and Subdomain WordPress.com also offers a free hosting plan, which is an excellent option for beginners who want to get started with WordPress at no cost. While it’s a simple and accessible way to build a site, there are some limitations that you’ll need to be aware of. Key Features of the WordPress.com Free Plan While WordPress.com offers a user-friendly platform for quickly and easily launching a website, the limitations of the free plan make it best suited for personal blogs, testing, or learning how to use WordPress. For more professional use, where a custom domain and ad removal are necessary, upgrading to a paid plan is advisable. When to Upgrade from Free to Paid Hosting Eventually, a free hosting plan may no longer meet the needs of your growing WordPress website. If you need to run additional plugins, install a more advanced WordPress theme, or expand your storage and bandwidth, consider upgrading. Free plans cannot often support unlimited traffic or offer the level of security required for professional use. Removing host branding, using a fully custom domain, or launching a commercial project demanding reliable uptime, custom email services, and dedicated support are valid reasons to move to a paid hosting plan. Upgrading gives you access to premium features such as a content delivery network (CDN), automated backup, enhanced developer tools, and the flexibility needed for high-performance hosting. If you’re ready to take your site to the next level, explore our hosting services, which offer unlimited
What is WordPress SSD Hosting?

When choosing a hosting service for your website, performance is often one of the most critical factors. For WordPress websites, where speed and reliability are critical, the hosting you choose can significantly impact your site’s success. One of the most popular options today is SSD hosting. But what exactly is SSD hosting, and how does it compare to traditional HDD hosting? In this article, we will explore the differences between SSD hosting and HDD hosting, the benefits of using SSD hosting for WordPress websites, and how to choose the right SSD hosting provider for your needs. What is SSD? A Solid State Drive (SSD) is a storage device that uses flash memory chips to store data, unlike traditional hard disk drives (HDDs), which rely on mechanical components. SSDs are much faster than HDDs because they have no moving parts. This means faster data access, reduced latency, and improved website performance. The absence of mechanical components makes SSDs more durable and less prone to mechanical failure. As a result, SSDs are an ideal choice for web hosting, where reliability and speed are critical. SSDs store data on nonvolatile flash memory, which retains data even when the power is off. This makes SSDs a reliable and efficient storage solution, especially for websites that require fast, uninterrupted access to data. What is SSD Hosting? SSD hosting is a type of hosting solution that utilizes solid-state drives (SSDs) to store and retrieve website data. SSDs are a storage technology that uses flash memory to hold data, unlike traditional storage methods that rely on mechanical components. This technology allows websites to access data much faster, offering an efficient way to handle the growing demands of modern websites. In SSD hosting, website files, databases, and other data are stored on SSDs within the hosting server. These SSDs provide fast and reliable access to data, making them an ideal choice for web hosting environments that require quick data retrieval and seamless performance. SSD Hosting vs. HDD Hosting Speed and Performance SSD hosting offers much faster data access than HDD hosting, which leads to quicker website load times. Since SSDs have no moving parts, data retrieval is almost instantaneous, resulting in faster page loads, which are critical for both user experience and search engine rankings. SSD hosting is ideal for websites that require fast and consistent performance, especially as they grow. On the other hand, HDD hosting relies on mechanical parts, leading to slower read and write speeds. As websites grow, HDD hosting may result in delayed data access and slower load times. Reliability and Durability SSDs are more reliable and durable than HDDs because they don’t have moving parts, making them less susceptible to mechanical failures. With their spinning disks and read/write heads, HDDs can wear out over time, leading to potential failure and data loss. SSD hosting offers a more dependable solution for websites requiring high uptime. Cost Considerations SSD hosting is typically more expensive than HDD hosting due to the higher production cost of SSDs. However, the performance benefits, such as faster load times, better reliability, and longer lifespan, often justify the additional cost. For businesses that depend on high-performance websites, the higher cost of SSD hosting may provide a better return on investment. Energy Efficiency SSDs consume less power than HDDs due to their lack of moving parts. This reduces electricity usage and may contribute to a more eco-friendly hosting solution. Latency and Data Access SSDs have lower latency than HDDs, ensuring faster data retrieval. This is especially beneficial for websites that rely on real-time applications or frequent database queries. Lifespan and Durability SSDs offer a longer lifespan in terms of data access cycles compared to HDDs, as they are not affected by physical wear and tear. Modern SSDs can handle many years of use, making them a more long-lasting solution for website hosting. Benefits of SSD Hosting for WordPress Websites Faster Loading Times and Reduced Latency SSD hosting directly improves WordPress website speed by offering faster load times and reduced latency. Faster page loads contribute to a better SEO ranking and user experience, reducing bounce rates and keeping visitors engaged. Improved User Experience With SSD hosting, WordPress websites become more responsive and interactive, increasing engagement and reducing bounce rates. Visitors are more likely to stay on a fast, smooth-running website, which improves the overall user experience. Enhanced Reliability and Increased Uptime Since SSDs have no moving parts, they are more reliable than HDDs, resulting in higher uptime for your WordPress website. This is crucial for websites that need constant availability and dependable performance. Better Scalability As your WordPress website grows, SSD hosting allows you to handle increased traffic and larger amounts of data without compromising performance. SSDs can efficiently manage higher traffic and complex queries, ensuring optimal website performance even during growth. Improved Security The resilience of SSDs reduces the risk of data loss or corruption, offering enhanced data protection for WordPress websites. The data integrity of SSD drives ensures that your website’s data remains secure, even during power failures. Disadvantages of SSD Hosting While SSD hosting offers numerous advantages, it’s not without its drawbacks. One of the main disadvantages is cost. SSD hosting plans are typically more expensive than HDD hosting plans due to the higher cost of SSDs. You should consider your budget for small website owners or personal websites, as this additional cost might be a factor in your decision-making process. Additionally, while SSDs are highly durable, they do have a limited number of write cycles, meaning that, over time, the storage can degrade. However, most SSD hosting providers use high-end, enterprise-grade SSDs designed to last longer, so this is not typically a concern for most users. Choosing the Right SSD Hosting Provider When selecting an SSD hosting company, evaluating reliability, speed, and customer support is essential. A reputable provider should offer consistent uptime, fast loading times, and strong customer service to ensure your website data is always secure and accessible. Look for hosting providers that offer managed services,
