Why is it important to resize and compress media before uploading to WordPress?

When managing a WordPress website, it’s easy to overlook the importance of resizing and compressing media files before uploading them to your media library. However, uploading large, unoptimized images and videos can significantly impact your site’s performance, user experience, and search engine optimization (SEO) rankings. This article will explore why resizing and compressing images before uploading them is crucial for your WordPress site and provide practical advice on optimizing your media. The Negative Impact of Large Media Files on Website Performance Website Performance and User Experience Oversized images or videos increase file sizes, slowing down page load speeds. Slow-loading websites create a poor user experience, especially when visitors leave before the page has fully loaded. This can result in higher bounce rates, reduced user engagement, and a negative impact on conversion rates. The strain from large, unoptimized files also affects website performance. As more media files accumulate, server load increases, resulting in slower response times and potentially higher hosting costs. On mobile devices, slow load times are even more noticeable, resulting in a frustrating user experience. Large images or videos can worsen these performance issues, making visitors less likely to stay on your site or return in the future. Consistently slow performance across devices can damage both user satisfaction and site loyalty. SEO (Search Engine Optimization) A slow website, caused by unoptimized media files, can negatively impact your search engine optimization (SEO) rankings. Search engines prioritize sites with fast load times, and slow websites are more likely to experience a drop in their rankings. Websites with slow page speeds are at a disadvantage in search engine results, which affects their visibility and overall SEO performance. Search engines have a limited time to crawl and index pages. Large media files can slow down this crawling process, reducing its efficiency. As a result, some of your content may not be indexed, resulting in incomplete search results. The presence of oversized media files can hinder search engines from effectively crawling and indexing your website’s full content, which in turn impacts how your site is displayed in search engine results. Website Storage and Resource Management Unoptimized media files occupy more space in your WordPress media library and on your server, leading to potential storage issues. This becomes increasingly problematic as your site expands and you upload more images, videos, and other large files. Over time, excessive storage usage can slow down your website, increase backup times, and result in higher hosting costs. As your site grows, the strain on your server resources also grows, affecting the overall performance of your website. As your WordPress site accumulates larger media files, managing storage becomes more challenging, especially when scaling to handle increased traffic. Sites with unoptimized files often struggle to maintain performance during traffic spikes. The increasing burden on server resources can impact site responsiveness and the user experience, making it difficult for the site to efficiently handle higher traffic levels. Overall Website Efficiency Large images or videos can cause delays in other interactions on your website, such as navigating between pages or submitting forms. This impacts not only page load times but also the overall efficiency of your site. When large media files slow down basic interactions, users may become frustrated and leave your site or abandon their activities, ultimately diminishing user satisfaction. Slow-loading websites caused by unoptimized media files can also distort your website analytics. Visitors may leave before completing key interactions or conversions, leading to inaccurate performance metrics. High bounce rates and lower conversion rates skew the data, making it challenging to measure the site’s true effectiveness accurately. This can hinder your ability to understand and improve user behavior and site performance. What Does Resizing and Compressing Images Mean? To ensure that your images are optimized for performance, resize and compress your media files before uploading them. Resizing images means changing the image’s dimensions to ensure it fits the layout of your WordPress site properly. For example, a high-resolution photo might be unnecessarily large for use as a thumbnail or in a blog post. By resizing the image to a smaller dimension, you’re reducing the image without losing image quality. Compression is the process of reducing the file size of an image or video. There are two main types of image compression: Combining both resizing and compression allows you to effectively reduce image size while maintaining high quality, which is essential for website speed and SEO performance. Choosing the Right Image Format for Optimization Different image formats have unique strengths and weaknesses. Choosing the correct format is essential when optimizing your media for WordPress. Popular image formats include JPEG, PNG, and WebP. By selecting the appropriate image format for each media file, you can optimize image size more effectively and ensure that images appear crisp on your WordPress site. How to Optimize Your Images Before You Upload Them to WordPress Before uploading images to WordPress, you should take the following steps to optimize images: Best WordPress Image Optimizer Plugins While manually resizing and compressing images is a good practice, it can be a time-consuming process. Fortunately, there are several WordPress image optimization plugins that can automatically resize and compress images when you upload them to the WordPress dashboard. Some of the best plugins include: Using these plugins can help you streamline the process and ensure that your images are always optimized before uploading to WordPress. Optimizing Previously Uploaded Media Files If your WordPress media library contains unoptimized images, you can still optimize them by resizing and compressing them to improve your site’s performance. Over time, large, unoptimized media files can slow down your site, affecting load times and overall website efficiency. Several WordPress plugins enable you to batch compress and optimize previously uploaded media files, saving time while reducing file size without compromising image quality. This ensures your site remains fast and efficient, even as your media library grows. Optimizing old images not only improves page speed but also boosts SEO. Since search engines prioritize websites that load quickly, reducing image size
How many WordPress Plugins are too Many?

WordPress powers millions of websites, largely due to its flexibility and vast plugin ecosystem. Plugins enable users to add features and customize their sites without requiring coding. But with thousands available, many ask: how many plugins are too many? This article will explain what WordPress plugins are, how they impact performance, and the effects of having too many. It will cover the ideal number of plugins, best management practices, and how to identify and remove unnecessary or outdated plugins. We’ll also discuss plugin quality, security risks, and ways to optimize your WordPress site. What Are WordPress Plugins? WordPress plugins are software extensions that enhance the capabilities of a WordPress site. They enable users to add functionalities ranging from SEO tools to e-commerce platforms, contact forms, security features, and more. The official WordPress plugin directory alone offers thousands of plugins, and many more are available from reputable developers. Every plugin you install integrates with your WordPress core and theme to tailor your website to your specific needs. However, the sheer quantity of plugins can sometimes overwhelm users, making it important to choose wisely. The Ideal Number of Plugins for Your Website There is no hard technical limit to how many plugins you can install, but many WordPress users and developers agree that having between 20 and 30 active plugins is a reasonable guideline to balance functionality and performance. This consensus is based on experience rather than a strict rule. Well-coded plugins from reputable developers usually have minimal impact on site speed and compatibility, allowing some websites to run smoothly even with dozens of plugins. However, factors such as the quality of the plugins, the robustness of your web host, the WordPress theme you use, and the specific needs of your site can influence the number of plugins you should have. Some sites may require fewer plugins to avoid performance issues, while others with a strong hosting environment and high-quality plugins can handle more. Ultimately, it’s more important to use the right plugins than to focus on the sheer number of plugins installed. How Excessive Plugins Affect WordPress Performance and Functionality The number of WordPress plugins you use directly impacts your site’s speed, stability, and overall functionality. While plugins add valuable features, installing too many can slow down your website by increasing database queries and server load. Active plugins may also conflict with each other or with your WordPress core, especially if some are outdated or poorly coded, which can lead to errors or crashes. Each plugin also increases the potential attack surface for your website, making security a critical concern. Outdated or abandoned plugins are a common source of vulnerabilities that hackers can exploit. Having an excessive number of plugins can cause bugs, degrade user experience, and introduce security risks. Redundant or unnecessary plugins further complicate site management and may slow down your WordPress website. To keep your site running smoothly, it’s crucial to monitor both the quantity and quality of the plugins you use, ensuring each plugin contributes positively to your site’s performance. Best Practices for Managing WordPress Plugins Effectively managing plugins on your WordPress site is crucial for maintaining optimal performance, security, and functionality. Here are some best practices every WordPress user should follow: Optimizing Your WordPress Site for Better Performance Managing the number of plugins is only one aspect of optimizing your WordPress website. Your web host and WordPress theme also play vital roles in site performance. Using a reliable WordPress hosting provider can enhance server response times and better handle the load generated by plugins. Complementary optimization techniques, such as caching, utilizing content delivery networks (CDNs), and image optimization, work in conjunction with plugin management to enhance your site’s speed and reliability. Regular maintenance, including plugin audits and updates, ensures your WordPress website continues to perform optimally. Conclusion Determining how many WordPress plugins are too many depends on multiple factors, including the quality of the plugins, your web host, and your website’s specific needs. While many plugins can add powerful features to your WordPress site, installing too many plugins without careful management may lead to performance issues, security risks, and conflicts. The key is to focus on installing the right plugins, well-coded, necessary, and from reputable sources, and to manage and update them actively. By balancing quantity with quality and following best practices for plugin management, you can maintain a fast, secure, and highly functional WordPress website.
How to Manage Your DNS Records in Web-Server

Configuring DNS (Domain Name System) settings for your website is an essential task to ensure that visitors can access your website seamlessly. Whether you’re setting up a new domain, updating existing DNS records, or troubleshooting issues, getting DNS configuration right is crucial for smooth website performance. In this guide, we’ll walk you through the step-by-step process of configuring DNS for your website in Web-Server. What is DNS, and Why Is It Important? DNS is the system that translates human-friendly domain names (e.g., www.yourwebsite.com) into machine-readable IP addresses that computers use to identify each other on the network. Essentially, DNS acts as the “phonebook” of the internet, helping browsers locate the servers hosting your website. Proper DNS configuration is crucial for several reasons: A well-configured DNS ensures that your website is always accessible, performs optimally, and your email routing works seamlessly. With that in mind, let’s dive into the process of configuring DNS for your website using Web-Server. Steps to Configure DNS for Your Website in Web-Server Now that you understand the importance of DNS, let’s take a look at how to configure it for your website on Web-Server. Follow these simple steps to manage your DNS settings effectively. Step 1: Log in to Your Web-Server Account To begin configuring your DNS settings, the first step is to access your Web-Server account: Once logged in, you will be directed to your account dashboard, where you can begin managing your DNS records. Step 2: Access DNS Management Tools Now that you’re logged in, you can access Web-Server’s DNS management tools to configure the DNS settings for your domain. Step 3: Add or Edit DNS Records At this point, you’ll be able to either add new DNS records or edit existing ones. There are various types of DNS records, each serving a specific function for your domain. The most common DNS records include: To add a new DNS record: Step 4: Wait for DNS Propagation Once you’ve made changes to your DNS records, it may take some time for those changes to propagate across the internet. DNS propagation is the process by which DNS changes are distributed across various servers worldwide. This typically takes anywhere from a few minutes to 24-48 hours, depending on the TTL (Time To Live) settings. During this propagation period, some users may see the old version of your website, while others will see the updated version. Step 5: Verify Your DNS Settings After waiting for the DNS changes to propagate, it’s important to verify that everything is working correctly. You can use third-party DNS lookup tools, such as MXToolbox, to verify your DNS records and confirm that the changes have taken effect. Step 6: Troubleshooting If your website is not appearing as expected or you encounter issues, follow these troubleshooting steps: Conclusion Configuring DNS for your website in the Web-Server is an important task that can significantly impact your website’s accessibility, performance, and email routing. By following the steps outlined in this guide, you’ll be able to set up and manage your DNS records with confidence. Remember, DNS changes can take time to propagate, so be patient and verify your settings regularly.
How to find out what WordPress theme a site uses

Knowing the WordPress theme a site uses is valuable for web developers, designers, and website owners who want to understand a site’s design or find the perfect WordPress theme. Whether you want to find out what WordPress theme a website is using for inspiration, troubleshooting, or customization, there are several reliable methods to do so. This article will cover how to use popular WP theme detector tools like isitwp.com and WPBeginner’s theme detector, manual techniques using the browser’s inspect element tool and page source, and explain the differences between parent, child, and custom themes. You’ll also learn tips for customizing themes and considerations when using the same theme as another WordPress website. Understanding WordPress Themes A WordPress theme controls the overall design and layout of a WordPress website. Themes range from simple templates to complex frameworks that include numerous features and customizations. There are three main types of themes: parent themes, child themes, and custom themes. A parent theme is a standalone theme that provides all the core design and functionality, serving as the foundation for other themes. A child theme inherits the parent theme’s features but allows for modifications without altering the original code. Custom themes, meanwhile, are built specifically for a website, often tailored to meet unique branding or functionality requirements. Knowing the theme a website uses provides valuable insight into its design framework and helps web developers or site owners replicate or customize similar styles on their WordPress site. IsItWP.com IsItWP.com is a popular, free WordPress theme detector tool designed to help users quickly and easily identify the theme a site is using. By simply entering the URL of a WordPress website into the tool, users can instantly discover the theme name, version, and even additional information about plugins active on the site. The tool scans the site’s publicly available data and extracts details from the theme’s files, providing a straightforward way to understand how a WordPress site is built without manually digging into the source code. For anyone who needs to find the theme a website uses without technical expertise, IsItWP.com provides an ideal, beginner-friendly solution. WPBeginner Theme Detector WPBeginner’s theme detector is another reliable online tool that helps users discover what WordPress theme a site uses. Similar to IsItWP.com, it requires only the domain or URL of the website to detect the active theme and plugins. This theme detector tool provides additional insight into whether the theme is premium or free, and may include links to download or purchase the theme. It’s particularly useful for web developers and designers who want to find the perfect WordPress theme based on a site’s appearance and features, enabling them to effectively replicate or customize designs. Manually Checking the Source Code For web developers or users comfortable with technical details, manually checking a site’s source code remains an effective way to find out what WordPress theme a site uses. By right-clicking anywhere on the webpage and selecting “Inspect” or “View Page Source,” users can access the browser’s developer tools. Searching for the style.css file within the wp-content/themes folder reveals the theme header block, which typically includes the theme name, theme version, author, and URI. This file contains essential CSS code that defines the site’s style and confirms whether the theme is a parent or child theme. Understanding the page’s source code and how the theme is structured within the wp-content directory allows users to manually discover the theme details, offering a more in-depth view than most theme detector tools provide. Advantages of Knowing a Site’s Theme Discovering the theme a WordPress site uses offers multiple advantages. For website owners and designers, it serves as inspiration to find a perfect WordPress theme that suits their project. It helps in troubleshooting design issues by understanding the theme’s capabilities and limitations. Moreover, knowing whether a website uses a premium theme, a custom theme, or a child theme informs decisions about purchasing or customizing similar themes. It also reveals the theme version and update status, which is critical for maintaining site security and compatibility. Overall, discovering the theme a site is using provides practical insights for web development and site management. Can You Use the Same Theme as Another Site? Using the same WordPress theme as another site is possible, but there are important considerations. Most WordPress themes, whether free or premium, allow multiple installations across different domains. However, many premium themes require a license purchase per site. Additionally, a theme’s default appearance may change significantly once customized by the website owner using page builders, CSS tweaks, or child themes. Custom themes are unique and typically unavailable for reuse unless you develop a similar one yourself. Therefore, simply finding the theme a website uses does not guarantee an identical look unless you apply the same customizations. Understanding these distinctions is crucial before deciding to replicate another site’s design. Tips for Customizing Your WordPress Theme Once you find the theme a website uses, customizing it to fit your brand and requirements is often necessary. The best practice involves creating a child theme to preserve the parent theme’s updates while allowing you to add custom CSS code and template modifications safely. Using browser inspection tools helps identify specific CSS classes or elements you want to change visually. Many themes are compatible with popular page builders, which enable drag-and-drop customization without coding. Plugins can extend functionality or modify layouts, making customization easier. Regularly checking the theme version and update availability ensures your site remains secure and optimized. Following these tips helps you tailor your WordPress website effectively while maintaining a stable foundation. To simplify customizing your WordPress site, choose an all-in-one hosting solution that includes a wide range of pre-installed themes ready to use right away. This lets you focus on tailoring your site’s design without the hassle of theme setup. With features like automatic backups, staging environments, and centralized management, your site stays fast, secure, and easy to maintain. Combining powerful tools and pre-installed themes, this solution makes customizing your WordPress website effortless and
cPanel Vs Plesk – Which Control Panel is Better?
Choosing the right hosting control panel is crucial for effective website and server management. In the ongoing discussion of Plesk vs cPanel, these two leading control panels stand out as popular choices among hosting providers and website owners. Each offers unique features, interfaces, and compatibility options that cater to different user needs. This article will discuss key aspects, including user interface, functionality, security, operating system compatibility, backup solutions, pricing, support, and WordPress integration. By exploring these areas, we aim to provide clarity on which control panel best fits your specific hosting environment. Overview of cPanel and Plesk cPanel and Plesk serve as comprehensive control panels designed to simplify the management of hosting environments. cPanel primarily targets Linux-based servers, offering a robust backend and user-friendly interface that has made it a staple in web hosting management for years. In contrast, Plesk offers compatibility with both Linux and Windows operating systems, providing flexibility for various hosting providers and users. Both platforms offer a set of tools for website control, domain management, email account setup, and server configuration; however, they differ in their approach to usability and functionality. User Interface Comparison cPanel features a straightforward graphical user interface designed primarily for Linux-based hosting users. It emphasizes clear navigation with dedicated sections for FTP, phpMyAdmin, email accounts, and DNS management. The familiar layout appeals to users who prefer simplicity and efficiency, making it easy to manage hosting tasks without unnecessary complexity. Plesk offers a more modern and customizable interface that supports both Linux and Windows environments. Its dashboard integrates seamlessly with various extensions and plugins, providing a flexible user experience. Plesk’s built-in WordPress toolkit further enhances usability, making it especially appealing to users managing multiple WordPress sites through its intuitive controls. Features and Functionality cPanel offers essential tools for website management, including FTP access, phpMyAdmin for database administration, and a Softaculous app installer for quick software deployment. It integrates with WHM to provide server-level control, making it a solid choice for traditional hosting setups focused on Linux servers. Plesk expands on these features by incorporating integrated Docker and Git support, catering to developers who require containerization and version control. Its extensive extension ecosystem allows customization tailored to specific needs. Plesk’s built-in WordPress toolkit offers advanced options, including staging, cloning, and Active Directory integration, which enhance management for WordPress users. Security Measures cPanel employs fail2ban intrusion prevention to guard against brute-force attacks and supports SSL certificate management, including automatic Let’s Encrypt installation. Encryption for FTP and email accounts ensures secure data transmission, relying on proven Linux-based security protocols. Plesk provides similar protections but adds advanced firewall configurations and Active Directory integration, offering more comprehensive security across both Linux and Windows systems. Its support for automated SSL certificate deployment and encrypted communications aligns with industry standards, while addressing diverse operating environments. Operating System Compatibility cPanel operates exclusively on Linux distributions, such as Ubuntu and Red Hat Enterprise, which limits its use to Linux-based hosting environments. This focus delivers stability and performance optimized for those platforms. Plesk supports both Linux and Windows servers, providing broader flexibility for hosting providers and users. This cross-platform compatibility enables Plesk to offer a wider range of hosting plans, particularly those that require Windows-based web hosting control. Backup and Restoration Options cPanel supports manual and scheduled backups, with options to store data remotely. Its backup system ensures data protection but relies on a more traditional interface and configuration process. Plesk offers automated backup scheduling with full and incremental backup options accessible through its user-friendly dashboard. The intuitive interface simplifies backup management and restoration, enhancing usability for administrators. Pricing Structures cPanel utilizes a licensing fee model based on account or server count, which can significantly increase costs in large hosting environments. This structure provides predictability but may limit scalability for growing providers. Plesk offers various subscription plans that include different feature sets and support levels, making it adaptable from small to enterprise-scale operations. While add-ons may incur additional costs, Plesk’s flexible pricing better suits diverse hosting needs and mixed operating system environments. Support and Documentation cPanel delivers extensive resources, including detailed documentation, an active community forum, and dedicated customer support. Its widespread adoption ensures numerous third-party support options. Plesk matches cPanel’s support offerings with comprehensive documentation, frequent updates, and an engaged community. Both platforms benefit from hosting providers that extend professional support services, ensuring reliable assistance for users. WordPress Integration cPanel facilitates WordPress management through third-party tools, such as Softaculous, enabling one-click installation and basic site administration features. Plesk’s integrated WordPress toolkit offers deeper functionality, including staging, cloning, plugin and theme management, and enhanced security tailored to WordPress environments. This built-in support streamlines website management, making Plesk the preferred choice for WordPress users requiring advanced control. Pros and Cons of cPanel and Plesk cPanel offers a straightforward, user-friendly interface favored for Linux hosting. Its core tools for FTP, database management, and server control through WHM are reliable and well-documented. However, cPanel only supports Linux, which limits flexibility, and licensing costs can rise sharply with a large number of accounts. It also lacks built-in developer tools, such as Docker or Git. Plesk supports both Linux and Windows, making it an appealing option for users who require cross-platform compatibility. Its integrated WordPress Toolkit, Docker, and Git support provide advanced management options. Plesk’s interface is customizable and offers strong security features, including Active Directory integration. The trade-off is a steeper learning curve for beginners and a more complex pricing model depending on required extensions. Which Control Panel is Better For You? Choose cPanel if you run Linux-based hosting and want a simple, reliable control panel for managing FTP, email, and databases. It suits beginners and those needing predictable licensing costs. Plesk is best suited for mixed Linux and Windows environments, or for users requiring developer tools such as Docker and Git. Its advanced WordPress support and customizable interface benefit those managing complex hosting setups or multiple sites. Consider your operating system, budget, and technical skills when making a decision. WordPress users may prefer Plesk’s built-in
How Much Does Website Maintenance Cost in 2025

Maintaining a website in 2025 requires careful planning and a clear understanding of ongoing expenses. For small business owners and website owners alike, budgeting for website maintenance is a crucial step in keeping a website functional, secure, and performing optimally. With the rise of website builders and the increasing complexity of websites, from basic websites to e-commerce sites, maintenance costs can vary significantly. This article will discuss the key factors influencing website maintenance costs in 2025, including hosting fees, domain renewal, software updates, outsourcing options, marketing and SEO expenses, as well as essential security and backup services. By exploring these components, website owners can better prepare a maintenance budget tailored to their website type and business needs. Factors Influencing Website Maintenance Cost in 2025 When considering the cost of website maintenance in 2025, several key factors play a significant role. The website type is one of the biggest influences. For example, a basic website or small business website typically has lower maintenance costs compared to a complex ecommerce website or SaaS platform. E-commerce sites require additional security, regular updates, and ongoing maintenance for payment processing, which increases maintenance costs. Website performance expectations and the volume of website visitors also impact maintenance costs. High-traffic websites need more robust hosting and optimization to ensure the site runs smoothly. Functionalities such as AI website features, custom integrations, or regular content updates add to ongoing maintenance expenses. Therefore, website maintenance pricing depends heavily on the unique business needs and the level of support required to keep your website running efficiently in 2025. Hosting Costs: The Foundation of Website Maintenance For a regular website with moderate traffic, many website builders offer affordable hosting plans as part of their packages, typically ranging from $5 to $50 per month. However, as business needs grow or if you run an e-commerce site, hosting costs increase due to the need for more server resources and better uptime guarantees, often ranging between $50 and $300 per month. Hosting costs in 2025 may be charged monthly or annually and are part of the ongoing maintenance costs that website owners must consider. Choosing the right hosting option is essential to maintain your website performing well without unnecessarily incurring higher website costs. Domain Name and Renewal Fees Alongside hosting, the cost of a domain name is an ongoing expense for website maintenance that website owners cannot overlook. The cost of a domain name varies depending on the extension (.com, .net, or .shop) and the registrar, but it usually requires annual renewal fees typically between $10 and $50 per year. Maintaining your domain ensures that your website remains accessible and helps protect your brand online. Small business websites often face manageable domain fees within this range, but when combined with other maintenance costs, it’s important to budget accordingly. Paid Plugins and Software Updates Maintaining a website often involves regular updates to software and plugins, especially for WordPress websites or e-commerce sites that rely on add-ons for added functionality. Paid plugins provide essential features but come with licensing fees that contribute to the overall cost of website maintenance. In 2025, ongoing plugin and CMS updates are crucial for maintaining your website’s security, functionality, and compatibility with modern web standards. These costs typically range from $50 to $200 annually, while premium plugins may add $5 to $50 per month, depending on licensing models. Neglecting these updates can lead to security vulnerabilities and decreased website performance, which can increase costs further due to emergency fixes or downtime. Outsourcing Website Maintenance: Agency and Freelancer Fees Website maintenance packages often include routine maintenance, security checks, backups, and performance monitoring. The monthly website maintenance cost for outsourced services varies widely depending on the website type and scope of services. Small business owners who outsource can focus on their core business activities while ensuring their website remains professional and operational. Basic maintenance packages typically cost between $75 and $300 per month, while ecommerce or professional sites may require a monthly fee of $300 to $1,000. Although outsourcing adds additional cost, it often reduces the true cost of website maintenance by preventing costly errors and downtime. Marketing, SEO, and Website Management Costs Regular website maintenance includes optimizing content for search engines, updating keywords, and managing digital marketing efforts to attract and retain website visitors. These activities contribute to website maintenance pricing but are essential for ensuring your website generates traffic and supports business growth. Small businesses typically spend between $100 and $500 per month on these services, whereas e-commerce or larger professional websites might allocate $500 to $2,000 per month. A professional website that includes SEO and marketing as part of its maintenance plan will typically cost more per month but provides better long-term value by improving visibility and engagement. Security and Backup Services Regular malware scanning, SSL certificate management, and daily or weekly backups help prevent data loss and keep websites running smoothly. Basic SSL certificates are often included in hosting plans, but advanced security services usually add $10 to $100 per month, depending on coverage and complexity. In 2025, investing in security services as part of your website maintenance budget is no longer optional, especially for e-commerce websites that handle sensitive customer data. These costs may be included in a maintenance package or purchased separately, depending on your website maintenance plan. Budgeting for Website Maintenance: Average Cost and Cost Ranges The cost of website maintenance in 2025 varies significantly, depending on the type of your website, your business needs, and the level of ongoing maintenance required for your site. For a small business website or a basic website using a website builder, the average monthly cost can range from $20 to $50, covering hosting, domain renewal, and basic plugin updates. For e-commerce websites or professional websites requiring higher maintenance, monthly costs can range from $100 to $500 or more, including outsourcing fees, premium plugin licenses, marketing, and security services. Website owners should create a maintenance budget that accounts for all these factors to avoid unexpected additional costs and keep
Best Hosting Control Panels

Choosing the right hosting control panel is crucial for effectively managing servers and web hosting services. These panels centralize management of domains, email, databases, FTP, SSL certificates, and other critical server functions. With complex environments involving VPS, Linux, and Windows operating systems, as well as diverse hosting plans, selecting a control panel that ensures usability, performance, and security is crucial. In this article, we will discuss the key factors to consider when choosing a hosting control panel. We will also review some of the most popular control panels available today, highlighting their features, compatibility, and suitability for different hosting needs. This guide aims to help system administrators, hosting providers, and website owners make informed decisions that streamline server management and improve overall hosting efficiency. What is a Hosting Control Panel A hosting control panel is software that provides a user-friendly interface for managing web servers and hosting services, eliminating the need for deep technical expertise. These panels centralize essential server tasks such as domain configuration, email account setup, database management, FTP access, SSL certificate installation, and firewall configuration. This consolidation improves usability and streamlines server management. Most control panels support multiple operating systems, primarily Linux distributions and Windows. Compatibility with these operating systems affects the control panel’s ability to manage server resources efficiently and integrate with web applications. Whether managing a single server or multiple servers, the right control panel offers scalability, essential security features, and simplifies server administration. Factors to Consider When Choosing a Hosting Control Panel Operating System Compatibility Many hosting control panels are designed specifically for Linux distributions such as Debian, CentOS, or Ubuntu, while others also support Windows servers. This compatibility directly affects the control panel’s ability to leverage resources, manage server performance, and support various hosting applications. Selecting a control panel that aligns with your operating system ensures smoother integration and better server management. User Experience and Usability A hosting control panel with an intuitive user interface and high usability reduces the learning curve, simplifying routine server management tasks. Panels designed to be user-friendly make it easier to navigate complex server settings, manage email, FTP access, SSL certificates, and firewall rules without extensive training. An easy-to-navigate web panel enhances overall server administration efficiency. Scalability and Integration Capabilities Hosting providers managing multiple servers or VPS hosting environments require control panels that efficiently support the management of multiple servers. Additionally, control panels that offer strong integration with popular web applications, such as WordPress and database management tools, provide added flexibility. Whether the control panel is open-source or commercial affects customization options and licensing costs. Open-source panels offer the freedom to customize the software with no licensing fees, while commercial control panels typically provide more polished feature sets and dedicated support. Security Features Security features, such as SSL certificate management and firewall configuration, are essential. Control panels that simplify SSL installation and renewal processes enhance website hosting security. Efficient server resource management, including SSH access and database administration, also enhances overall server performance. Choosing a control panel with comprehensive security features ensures safer server administration and protection against vulnerabilities. cPanel cPanel is one of the most popular web hosting control panels in the industry, especially favored for Linux hosting environments. Its comprehensive feature set includes domain management, FTP, email accounts, database management, and integration with WordPress. cPanel’s user-friendly interface and robust server management tools make it accessible to both beginners and experienced system administrators. The control panel is designed to optimize server performance while providing essential features, including SSL certificate management, firewall configuration, and SSH access. cPanel’s compatibility with a wide range of Linux distributions and its extensive support network make it a reliable choice for many hosting providers and web hosts managing VPS and dedicated servers. Plesk Plesk stands out for its versatility, supporting both Linux and Windows operating systems, which enables seamless management of heterogeneous server environments. Plesk’s feature set includes multi-server management, scalability, integration with popular web applications, and advanced security tools, including SSL certificate handling and firewall management. This hosting control panel offering is favored by those who require a control panel designed to support a wide range of hosting plans and modern hosting services. Plesk supports smooth administration through its intuitive user interface, making it a popular choice among commercial control panels. Its ability to manage resources efficiently while supporting various operating systems is a significant advantage. DirectAdmin DirectAdmin is a lightweight hosting panel designed to simplify server management with low resource consumption. It appeals particularly to small to medium-sized hosting providers and VPS hosting environments seeking efficient server control without sacrificing usability. Despite its simplicity, DirectAdmin offers essential features, including database administration, email setup, FTP, and SSL certificate integration. Its intuitive web interface provides ease of use, making it an easy hosting control panel to navigate. This efficiency makes DirectAdmin a practical choice for hosting providers aiming to maintain server performance while streamlining server administration tasks. ISPConfig ISPConfig is an open-source web hosting control panel popular among hosting providers who prefer a free license with the freedom to customize. It supports various Linux distributions and offers strong system administration tools, including multi-server management and email account handling. Its open-source nature allows system administrators to tailor the control panel according to specific hosting needs, making it flexible for various hosting plans. ISPConfig supports server management tasks, including firewall configuration, database administration, and SSL handling, aligning well with modern hosting demands. Webmin Webmin is a powerful open-source control panel known for its flexibility and support across multiple operating systems, including Debian and other Linux distributions. It provides an easy-to-navigate web interface that allows users to manage server resources, firewall rules, and essential system administration functions. While Webmin is less focused on commercial hosting services, it excels in providing detailed server control for system administrators comfortable with granular server management. Its open-source nature ensures a free license and freedom to customize, making it a valuable tool for managing Linux and BSD systems. Vesta Control Panel Vesta Control Panel offers a straightforward and intuitive user
How to Migrate Your WordPress Website to Web-Server
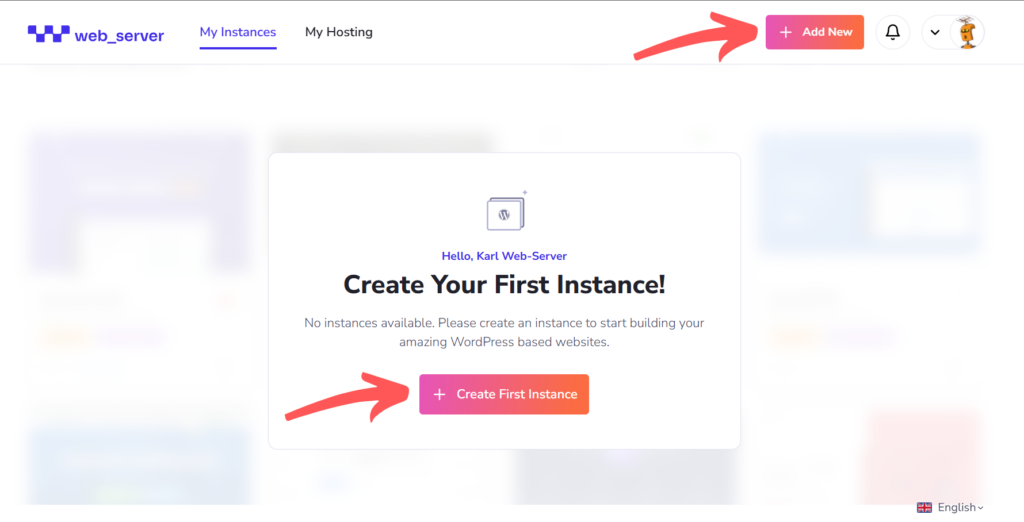
Migrating your WordPress website to a new hosting provider can feel overwhelming, especially if you’re unfamiliar with the technical details. However, with the right approach and tools, it can be a straightforward and stress-free experience. In this article, we will explore the essentials of migrating your WordPress site to Web-Server, including preparing for migration, the step-by-step process using Web-Server’s built-in tools, and what to do after the move to ensure your site runs smoothly. Whether you’re seeking improved speed, enhanced security, or easier site management, this guide will provide you with clear instructions and helpful tips to make your migration successful. What is Website Migration, and Why Does it Matter? Website migration involves transferring your entire WordPress site, including files, databases, themes, plugins, and settings, from one hosting provider to another. The main goal is to move your site seamlessly without losing data or causing downtime for your visitors. Website owners migrate for various reasons: to improve performance, enhance security, reduce costs, or simplify management. Migration may also be driven by the need for scalability or better customer support. While the benefits are clear, migration requires careful planning to avoid issues like broken links, data loss, or downtime that could disrupt the user experience or impact SEO. How Does Migration Work on Web-Server? Web-Server offers an easy-to-use migration feature that automates much of the process. Instead of manually copying files and databases, you can import your existing WordPress site by providing your current URL and FTP credentials. This saves time and reduces errors, making migration accessible even if you’re not a technical expert. Before you begin, ensure you have your current FTP hostname, username, password, and the path where WordPress is installed. It’s also a good idea to create a backup of your site, just in case. Step-by-Step Guide to Migrating Your WordPress Site Step 1: Log in to WBS Access your Web-Server account dashboard by logging in. If you don’t have an account, sign up on the Web-Server platform to get started. Step 2: Initiate the Migration If this is your first time logging in and you don’t have any WordPress instances, click the Create First Instance button. If you already have existing instances, click the Add New button in your dashboard’s upper right corner. Both options will direct you to the migration process. Step 3: Enter Your Current WordPress URL Choose Import Existing WordPress Instance, then enter the URL of your current WordPress site when prompted. Step 4: Enter Your FTP Account Before entering your FTP details, make sure you have your hostname, username, password, and installed path ready. These are needed to securely connect Web-Server to your current host and transfer your site files. If you have this information, go ahead and enter your FTP hostname or IP address, username, password, and installed path below. Then click Continue to start the migration. Depending on your site size, this may take a few minutes. If you’re unsure where to find your FTP credentials, don’t worry, this is a common question. We’ve included a quick guide to help you locate them on popular hosting platforms. Your FTP credentials are usually available in your hosting account’s control panel. Here’s how to find them for some of the top hosting providers: If your hosting provider isn’t listed, try logging into your hosting dashboard and looking for sections labeled FTP Accounts, FTP Settings, or FTP Access. Alternatively, you can contact your hosting provider’s support team for help. Once you have your FTP details, return to Step 4 to complete the migration setup. Step 5: Complete Migration Once the migration finishes, you’ll receive a confirmation. You can now access your WordPress dashboard or manage your site directly through Web-Server’s interface. What to Do After Migration Troubleshooting and Support If your migration doesn’t go as planned, here are some common issues and solutions: Make the Move with Confidence Migrating your WordPress site to Web-Server is not just a technical step; it’s a strategic decision to enhance your website’s performance, security, and ease of management. Web-Server’s powerful and intuitive migration tools make the transition seamless and efficient, ensuring that even those new to site transfers can complete the process with confidence and minimal effort. By choosing Web-Server, you’re investing in a hosting platform designed to deliver lightning-fast loading speeds, robust protection against threats, and centralized management features that simplify your day-to-day operations. Start your migration today and take the first step towards a more reliable, secure, and high-performing website that supports your business goals and growth.
What is NVMe Hosting?

As websites and applications become more resource-intensive, the demand for faster and more efficient hosting solutions continues to grow. The storage technology used in a hosting plan plays a critical role in overall site performance, especially as user expectations rise and digital workloads increase. This article will explore what NVMe hosting is, how it functions within modern server infrastructure, and how it compares to traditional SSD and HDD hosting. It will also cover the different types of hosting that utilize NVMe technology, the performance advantages it delivers, and when it is worth making the switch for better speed, scalability, and reliability. What is NVMe and Why Does it Matter in Hosting NVMe stands for Non-Volatile Memory Express. A storage interface that connects solid-state drives (SSDs) directly to a server’s motherboard using the Peripheral Component Interconnect Express (PCIe) bus. This approach allows for much faster data transfer speeds compared to the older SATA interface used by traditional SSD storage and hard disk drives (HDDs). NVMe SSDs significantly reduce access times and latency by allowing parallel command execution, making them ideal for applications that require rapid data processing. In hosting environments, this translates into more responsive websites and applications, especially under high-traffic conditions. Unlike traditional storage devices, Non-Volatile Memory Express drives are engineered to handle heavy workloads with minimal delay. They offer faster performance because they use fewer CPU cycles to manage storage, leading to more efficient server resource utilization. How NVMe Hosting Works in Modern Infrastructure NVMe hosting integrates NVMe storage technology into various hosting setups, including shared hosting, VPS hosting, and dedicated server hosting. By replacing older SSDs or HDDs with NVMe drives, hosting providers can deliver faster data access and increased customer throughput. Non-Volatile Memory Express drives also provide benefits in shared hosting environments, but they’re most impactful in VPS hosting and dedicated server hosting. For instance, it enhances a virtual private server’s read/write speeds, improving overall performance for websites hosted on the server. Dedicated server hosting using NVMe ensures that all physical resources, including these drives, are allocated solely to one user, offering unmatched speed and reliability. Types of Hosting That Use NVMe Technology Different hosting services now include NVMe as a core component of their infrastructure. NVMe VPS hosting is one of the most popular options, balancing performance and cost. A VPS server with NVMe storage is ideal for medium to large-scale websites that require more resources than shared hosting can provide. Non-Volatile Memory Express dedicated servers are tailored for high-performance workloads like e-commerce sites, high-traffic applications, and enterprise-level software deployments. These servers ensure dedicated resources and faster data processing, making them a strong fit for businesses that prioritize speed and reliability. NVMe SSD shared hosting plans are also available. These plans offer an upgrade over traditional SSD hosting, using Non-Volatile Memory Express drives to deliver faster website performance, even within shared environments. NVMe vs Traditional SSD and HDD Hosting Traditional SSD hosting, while faster than HDDs, relies on the SATA interface, which limits their data transfer capabilities. HDD hosting, on the other hand, uses spinning disks and mechanical components, making it the slowest and least reliable option. NVMe hosting uses the PCIe interface, which provides faster data paths directly to the CPU. This results in lower latency, higher input/output operations per second (IOPS), and significantly better performance and reliability. It has faster drives than traditional SSDs by a wide margin and offers superior scalability for growing websites. The performance difference is especially clear in high-traffic scenarios, where websites hosted on NVMe platforms maintain consistent speed and responsiveness compared to those using traditional storage. Performance Advantages of NVMe Hosting One of the most compelling benefits is its ability to enhance overall performance. Fast data transfer and reduced access times ensure that websites and applications load quickly, even during peak traffic periods. NVMe technology supports faster speeds than traditional storage options, which is essential for maintaining strong website performance. It also improves the hosting environment’s efficiency. With lower latency and better server RAM use, applications requiring heavy data access perform more smoothly. This results in better resource management and a more stable user experience. It provides high performance across a range of use cases, from small business websites to large-scale platforms with intensive data needs, because it can handle larger workloads with less strain on server hardware. When to Consider Switching to NVMe Hosting Businesses and developers using traditional SSD or HDD hosting should consider switching to NVMe hosting if they require better performance, faster load times, or more reliable uptime. Applications experiencing performance bottlenecks, ecommerce platforms with high transaction volumes, and websites seeing increased traffic are all strong candidates for storage upgrades. Hosting plans powered by NVMe offer better scalability and are ideal for those who anticipate future growth. Whether you’re running a virtual private server or need a dedicated hosting environment, switching to NVMe provides long-term performance benefits that traditional storage simply can’t match. Driving Better Hosting Performance with NVMe Technology NVMe hosting represents a significant advancement in web hosting technology. By leveraging the speed and efficiency of its storage, hosting providers can offer fast data access, lower latency, and superior reliability across all types of hosting plans. As more businesses prioritize site speed and performance, NVMe hosting offers a future-proof solution that delivers on both fronts. Whether using shared hosting, a VPS server, or a dedicated server, upgrading to NVMe can substantially improve your website’s performance and reliability in today’s demanding digital environment.
Managed WordPress Hosting vs Shared Hosting

Choosing the right hosting plan is essential to building a WordPress website. Hosting is a service that stores your website’s files and makes them accessible online. With many hosting options available, it can be challenging to decide which one best fits your needs. This article will explore the key differences between managed WordPress hosting and shared hosting. We will explain what each hosting type offers, highlight their unique features and benefits, and help you understand which hosting option best suits your WordPress site based on your needs and budget. What Is Shared Hosting? Shared hosting is a cost-effective web hosting service in which multiple websites share a single server’s resources, like CPU, memory, and bandwidth. Due to its affordability and simplicity, shared hosting is a popular plan for beginners and small websites. Shared hosting plans typically include basic features like control panel access, email hosting, and one-click installers for platforms like WordPress. While shared hosting provides an easy way to get a website online, it is not specifically optimized for WordPress sites. Resources are shared among users, leading to fluctuating performance and limited security. Additionally, shared hosting plans usually lack automatic WordPress updates and dedicated WordPress support, making them less suitable for growing or resource-intensive WordPress websites. What Is Managed WordPress Hosting? Managed WordPress hosting is a type of hosting service optimized specifically for WordPress websites. Unlike shared hosting, it provides dedicated resources and includes full technical task management by the hosting provider. Managed WordPress hosting plans include automatic WordPress core updates, daily backups, caching tools, enhanced security, staging environments, and expert WordPress support. Benefits include faster load times, improved uptime, and proactive security tailored for WordPress sites. Managed hosting frees site owners from technical maintenance, allowing them to focus on content and growth. Though it generally carries a higher price tag than shared hosting, many find the investment worthwhile for the specialized performance and support. Differences Between Managed WordPress Hosting and Shared Hosting The main differences between shared hosting and managed WordPress hosting involve resource allocation, management, and optimization. Shared hosting means websites share server resources, which can cause slower speeds and inconsistent performance during traffic spikes. Managed WordPress hosting allocates dedicated resources optimized specifically for WordPress sites, ensuring stable performance and faster load times. Shared hosting plans typically leave WordPress updates and security to the user in terms of management. Managed hosting providers handle automatic updates, backups, and proactive security, reducing the technical burden on site owners. Features like staging environments and WordPress-optimized server configurations further differentiate managed WordPress hosting from standard shared hosting plans. While shared hosting offers an affordable entry point suitable for small or low-traffic sites, it lacks the tailored optimizations and comprehensive support of managed WordPress hosting. Choosing the right hosting plan depends on your website’s size, traffic, and technical needs. Choosing Between Shared Hosting and Managed WordPress Hosting When Shared Hosting Makes Sense Shared hosting is a cost-effective solution for small websites, blogs, or projects with limited budgets and low traffic. Many shared hosting providers offer plans with easy WordPress installation tools and basic support, making it accessible for beginners and those launching their first WordPress website. However, since shared hosting is not optimized specifically for WordPress sites, it may lack features like automatic updates, advanced security, and performance enhancements. Shared hosting may no longer meet your needs as your WordPress site grows in size or traffic. Why Opt for Managed WordPress Hosting Managed WordPress hosting is designed specifically for WordPress websites, providing hosting plans with automatic core updates, daily backups, malware scanning, and expert WordPress support. This hosting option offers faster loading speeds and improved uptime through dedicated resources and server configurations optimized specifically for WordPress sites. It’s especially beneficial for e-commerce or high-traffic sites requiring stable performance and enhanced security. While managed hosting typically has a higher price tag than shared hosting, it delivers a comprehensive hosting solution tailored to the needs of WordPress website owners who want professional support and worry-free management. Other Hosting Types to Consider Beyond shared hosting and managed WordPress hosting, other hosting types like VPS (Virtual Private Server) and dedicated hosting offer alternatives for growing WordPress websites. VPShosting provides a virtualized server environment with dedicated resources, offering better control and performance than shared hosting. Dedicated hosting rents an entire physical server, delivering maximum customization and reliability but requiring more technical expertise and a larger budget. These hosting solutions are worth considering if your WordPress website exceeds the limits of shared or managed WordPress hosting plans, especially when your site demands increased resources, flexibility, or advanced configurations. How to Choose the Right Hosting Provider Selecting the right hosting provider is crucial for your WordPress site’s success. Look for a hosting company that understands platforms like WordPress and offers web hosting plans optimized specifically for WordPress sites. Important factors include uptime guarantees, security features, speed optimization, customer support quality, and scalability. Whether you choose a shared hosting plan or a managed WordPress hosting plan, the hosting provider influences your website’s performance, reliability, and ease of management. The best managed WordPress hosting providers combine optimized environments with expert support and features that help you maintain and grow your WordPress website efficiently. Conclusion Choosing between managed WordPress hosting and shared hosting depends on your website’s size, traffic, budget, and technical needs. Shared hosting offers an affordable entry point for small, low-traffic WordPress sites but lacks WordPress-specific features and optimization. Managed WordPress hosting provides a hosting solution optimized specifically for WordPress sites, delivering superior speed, security, and professional support at a higher price. By understanding these differences and assessing your WordPress website’s requirements, you can select the hosting plan that ensures your site performs well and remains secure as it grows.
